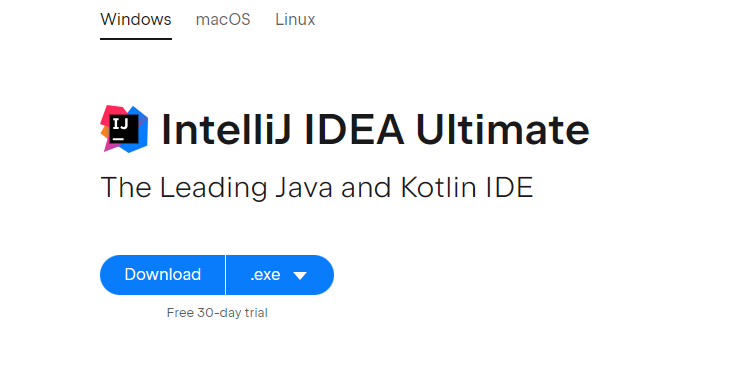
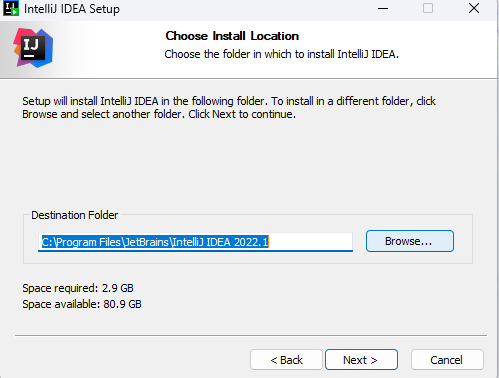
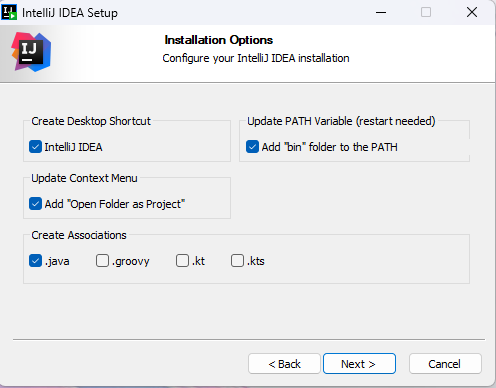
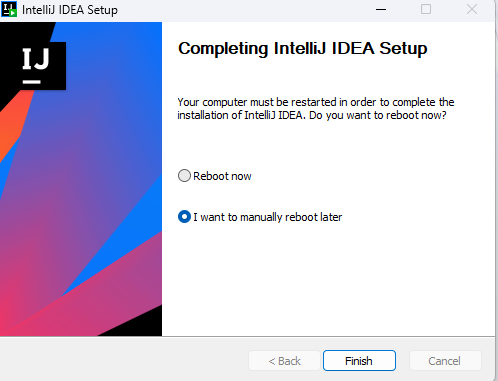
<?xml version="1.0" encoding="utf-8"?>
<feed xmlns="http://www.w3.org/2005/Atom">
  <title>Rsheng&#39;blog</title>
  
  <subtitle>RS</subtitle>
  <link href="http://rs-zt.github.io/atom.xml" rel="self"/>
  
  <link href="http://rs-zt.github.io/"/>
  <updated>2023-07-13T02:00:40.083Z</updated>
  <id>http://rs-zt.github.io/</id>
  
  <author>
    <name>任胜</name>
    
  </author>
  
  <generator uri="https://hexo.io/">Hexo</generator>
  
  <entry>
    <title>JDK安装与配置</title>
    <link href="http://rs-zt.github.io/2023/07/13/JDK%E5%AE%89%E8%A3%85%E4%B8%8E%E9%85%8D%E7%BD%AE/"/>
    <id>http://rs-zt.github.io/2023/07/13/JDK%E5%AE%89%E8%A3%85%E4%B8%8E%E9%85%8D%E7%BD%AE/</id>
    <published>2023-07-13T01:24:03.000Z</published>
    <updated>2023-07-13T02:00:40.083Z</updated>


    <category term="jdk" scheme="http://rs-zt.github.io/tags/jdk/"/>
    
  </entry>
  
  <entry>
    <title>mysql语法</title>
    <link href="http://rs-zt.github.io/2023/07/12/mysql%E8%AF%AD%E6%B3%95/"/>
    <id>http://rs-zt.github.io/2023/07/12/mysql%E8%AF%AD%E6%B3%95/</id>
    <published>2023-07-12T13:34:30.000Z</published>
    <updated>2023-07-12T15:17:29.395Z</updated>
    
    <content type="html"><![CDATA[<h2 id="1-基本概念"><a href="#1-基本概念" class="headerlink" title="1.基本概念"></a>1.基本概念</h2><ul><li>数据库的概念</li></ul><p>​1）结构化查询语言（Structured Query Language）简称SQL；<br>​2）数据库管理系统（Database Management System）简称DBMS；<br>​3）数据库管理员（Database Administration）简称DBA，功能是确保DBMS的正常高效运行；</p><ul><li>SQL常用的3个部分</li></ul><p>​1）数据查询语言（DQL）：其语句也称“数据库检索语句”，用以从表中获得数据，保留字SELECT经常使用，DQL也是所有SQL中用的最多的，其他保留字还有WHERE, ORDER BY, GROUP BY和HAVING这些保留字还与DML一起使用；<br>​2）数据操作语言（DML）：其余局包括动词INSERT，UPDATE和DELETE。他们分别用于添加，修改和删除表中的行。也称动作语言；<br>​3）数据定义语言（DDL）：DDL主要用于操作数据库。</p><h2 id="2-SQL列的常用类型"><a href="#2-SQL列的常用类型" class="headerlink" title="2.SQL列的常用类型"></a>2.SQL列的常用类型</h2><table><thead><tr><th>MySQL</th><th>Java</th></tr></thead><tbody><tr><td>INT</td><td>int</td></tr><tr><td>BIGINT</td><td>long</td></tr><tr><td>DECIMAL</td><td>BigDecimal</td></tr><tr><td>DATE&#x2F;DATETIME</td><td>java.util.Date</td></tr><tr><td>VARCHAR</td><td>String</td></tr></tbody></table><h2 id="3-DDL简单操作"><a href="#3-DDL简单操作" class="headerlink" title="3.DDL简单操作"></a>3.DDL简单操作</h2><h3 id="3-1数据库的操作"><a href="#3-1数据库的操作" class="headerlink" title="3.1数据库的操作"></a>3.1数据库的操作</h3><ul><li>连接数据库语句</li></ul><figure class="highlight plaintext"><table><tr><td class="gutter"><pre><span class="line">1</span><br></pre></td><td class="code"><pre><span class="line">mysql -uroot -proot</span><br></pre></td></tr></table></figure><ul><li>查看数据库列表</li></ul><figure class="highlight plaintext"><table><tr><td class="gutter"><pre><span class="line">1</span><br></pre></td><td class="code"><pre><span class="line">show databases</span><br></pre></td></tr></table></figure><ul><li>创建数据库</li></ul><figure class="highlight plaintext"><table><tr><td class="gutter"><pre><span class="line">1</span><br></pre></td><td class="code"><pre><span class="line">create database 数据库名称</span><br></pre></td></tr></table></figure><ul><li>删除数据库</li></ul><figure class="highlight plaintext"><table><tr><td class="gutter"><pre><span class="line">1</span><br></pre></td><td class="code"><pre><span class="line">drop database 数据库名称</span><br></pre></td></tr></table></figure><ul><li>修改数据库</li></ul><figure class="highlight plaintext"><table><tr><td class="gutter"><pre><span class="line">1</span><br></pre></td><td class="code"><pre><span class="line">alter database 数据库名称 charset=编码格式</span><br></pre></td></tr></table></figure><ul><li>查看当前数据库下所有数据表</li></ul><figure class="highlight plaintext"><table><tr><td class="gutter"><pre><span class="line">1</span><br></pre></td><td class="code"><pre><span class="line">show tables</span><br></pre></td></tr></table></figure><h3 id="3-2-表的操作"><a href="#3-2-表的操作" class="headerlink" title="3.2 表的操作"></a>3.2 表的操作</h3><ul><li>表的约束</li></ul><p>1.非空约束: NOT NULL,不允许某列的内容为空</p><p>2.设置列的默认值:DEFAULT</p><p>3.唯一约束: unique,该表中,该列的内容必须唯一</p><p>4.主键约束: primary key,非空且唯一</p><p>5.主键自增长: auto_increment,从1开始,步长为1</p><p>6.外键的约束:foreign key.A表中的外键列.A表中的外键列必须参照B表中的某一列</p><ul><li>建表</li></ul><p>1.建表语法</p><figure class="highlight plaintext"><table><tr><td class="gutter"><pre><span class="line">1</span><br><span class="line">2</span><br><span class="line">3</span><br><span class="line">4</span><br><span class="line">5</span><br><span class="line">6</span><br></pre></td><td class="code"><pre><span class="line">列名1  列的类型  [约束],</span><br><span class="line">列名2  列的类型  [约束],</span><br><span class="line">...</span><br><span class="line">列名N  列的类型  [约束]</span><br><span class="line">);</span><br><span class="line">// 注意：最后一行没有逗号</span><br></pre></td></tr></table></figure><figure class="highlight plaintext"><table><tr><td class="gutter"><pre><span class="line">1</span><br><span class="line">2</span><br><span class="line">3</span><br><span class="line">4</span><br><span class="line">5</span><br><span class="line">6</span><br><span class="line">7</span><br><span class="line">8</span><br></pre></td><td class="code"><pre><span class="line">drop table if exit &#x27;student&#x27;//表示数据库有这个表就删除</span><br><span class="line">create table student(</span><br><span class="line">id BIGINT PRIMARY KEY AUTO_INCREMENT</span><br><span class="line">    name varchar(25) unique</span><br><span class="line">    email varchar(25) not null</span><br><span class="line">    age int defaut 17</span><br><span class="line">);</span><br><span class="line"></span><br></pre></td></tr></table></figure><ul><li>删除表</li></ul><p>1.删除表的语法</p><figure class="highlight plaintext"><table><tr><td class="gutter"><pre><span class="line">1</span><br><span class="line">2</span><br></pre></td><td class="code"><pre><span class="line">drop table 表的名称</span><br><span class="line"></span><br></pre></td></tr></table></figure><h2 id="4-DML操作"><a href="#4-DML操作" class="headerlink" title="4.DML操作"></a>4.DML操作</h2><h3 id="4-1-修改操作-update-set"><a href="#4-1-修改操作-update-set" class="headerlink" title="4.1 修改操作(update set)"></a>4.1 修改操作(update set)</h3><ul><li>语法</li></ul><figure class="highlight plaintext"><table><tr><td class="gutter"><pre><span class="line">1</span><br><span class="line">2</span><br><span class="line">3</span><br><span class="line">4</span><br></pre></td><td class="code"><pre><span class="line">UPDATE 表名</span><br><span class="line">SET 列1 = 值1, 列2 = 值2, ...</span><br><span class="line">WHERE [条件]</span><br><span class="line"></span><br></pre></td></tr></table></figure><ul><li>实战</li></ul><figure class="highlight plaintext"><table><tr><td class="gutter"><pre><span class="line">1</span><br></pre></td><td class="code"><pre><span class="line">update student set name=&quot;张三&quot; where name=&quot;李四&quot;</span><br></pre></td></tr></table></figure><h4 id="注意-不要省略where条件语句-否则全表都会更改"><a href="#注意-不要省略where条件语句-否则全表都会更改" class="headerlink" title="注意:不要省略where条件语句,否则全表都会更改"></a>注意:不要省略where条件语句,否则全表都会更改</h4><h3 id="4-2-插入操作-insert-into-value"><a href="#4-2-插入操作-insert-into-value" class="headerlink" title="4.2 插入操作(insert into value)"></a>4.2 插入操作(insert into value)</h3><ul><li>语法</li></ul><figure class="highlight plaintext"><table><tr><td class="gutter"><pre><span class="line">1</span><br><span class="line">2</span><br></pre></td><td class="code"><pre><span class="line">INSERT INTO 表名 (列1，列2，...) VALUE (值1，值2，...);</span><br><span class="line"></span><br></pre></td></tr></table></figure><ul><li>实战</li></ul><figure class="highlight plaintext"><table><tr><td class="gutter"><pre><span class="line">1</span><br></pre></td><td class="code"><pre><span class="line">insert into student (id,name, age,email)values(1,&quot;张三&quot;,17,&quot;15655@qq.com&quot;)//插入全部记录</span><br></pre></td></tr></table></figure><h3 id="4-3-删除操作-DELETE"><a href="#4-3-删除操作-DELETE" class="headerlink" title="4.3 删除操作(DELETE)"></a>4.3 删除操作(DELETE)</h3><ul><li>语法</li></ul><figure class="highlight plaintext"><table><tr><td class="gutter"><pre><span class="line">1</span><br></pre></td><td class="code"><pre><span class="line">delete from 表名 where [条件]</span><br></pre></td></tr></table></figure><ul><li>实战</li></ul><figure class="highlight plaintext"><table><tr><td class="gutter"><pre><span class="line">1</span><br></pre></td><td class="code"><pre><span class="line">delete from student where id=4</span><br></pre></td></tr></table></figure><h4 id="注意-where条件语句不能省略-否则全表都会被删除"><a href="#注意-where条件语句不能省略-否则全表都会被删除" class="headerlink" title="注意:where条件语句不能省略,否则全表都会被删除"></a>注意:where条件语句不能省略,否则全表都会被删除</h4><h2 id="5-DQL操作"><a href="#5-DQL操作" class="headerlink" title="5.DQL操作"></a>5.DQL操作</h2><p><img lazyload alt="image" data-src="/./mysql%E8%AF%AD%E6%B3%95/1.png"></p><h3 id="5-1消除重复元素-distinct"><a href="#5-1消除重复元素-distinct" class="headerlink" title="5.1消除重复元素(distinct)"></a>5.1消除重复元素(distinct)</h3><ul><li>语法</li></ul><figure class="highlight plaintext"><table><tr><td class="gutter"><pre><span class="line">1</span><br></pre></td><td class="code"><pre><span class="line">select distinct 列名,...from 表名</span><br></pre></td></tr></table></figure><h4 id="注意-distinct放在2个字段前-是2个字段组合后重复才去重，放在第一个后会报错"><a href="#注意-distinct放在2个字段前-是2个字段组合后重复才去重，放在第一个后会报错" class="headerlink" title="注意:distinct放在2个字段前,是2个字段组合后重复才去重，放在第一个后会报错"></a>注意:distinct放在2个字段前,是2个字段组合后重复才去重，放在第一个后会报错</h4><ul><li>实战</li></ul><figure class="highlight plaintext"><table><tr><td class="gutter"><pre><span class="line">1</span><br></pre></td><td class="code"><pre><span class="line">select distinct productname,brand from product</span><br></pre></td></tr></table></figure><h3 id="5-2算术运算符-x2F"><a href="#5-2算术运算符-x2F" class="headerlink" title="5.2算术运算符(+,-,*,&#x2F;)"></a>5.2算术运算符(+,-,*,&#x2F;)</h3><ul><li>算术运算符的使用范围<br>1）对 number 型数据可以使用算术运算符（+，-，*，&#x2F;）对数据进行操作；对date型数据可以使用部分算术运算符（+，-）对数据进行操作。</li><li>算术运算符的优先级<br>1）与数学中运算相同</li><li>实战</li></ul><figure class="highlight plaintext"><table><tr><td class="gutter"><pre><span class="line">1</span><br></pre></td><td class="code"><pre><span class="line">selectid,productName,salePrice*discount from product</span><br></pre></td></tr></table></figure><h3 id="5-3-设置别名-AS"><a href="#5-3-设置别名-AS" class="headerlink" title="5.3 设置别名(AS)"></a>5.3 设置别名(AS)</h3><ul><li>作用<br>1）改变列的标题头；<br>2）作为计算结果的含义；<br>3）作为列的别名；<br>4）如果别名使用特殊字符（强烈不建议使用特殊字符），或是强制大小写或有空格时都需要加单引号。</li><li>语法</li></ul><figure class="highlight plaintext"><table><tr><td class="gutter"><pre><span class="line">1</span><br><span class="line">2</span><br><span class="line">3</span><br></pre></td><td class="code"><pre><span class="line"></span><br><span class="line">select 列名 as 别名 from 表名 [where]</span><br><span class="line">select 列名  别名 from 表名[where]</span><br></pre></td></tr></table></figure><ul><li>实战</li></ul><figure class="highlight plaintext"><table><tr><td class="gutter"><pre><span class="line">1</span><br></pre></td><td class="code"><pre><span class="line">select id,productName,SaleProce* dicount as price from product</span><br></pre></td></tr></table></figure><h3 id="5-4按格式输出-concat"><a href="#5-4按格式输出-concat" class="headerlink" title="5.4按格式输出(concat)"></a>5.4按格式输出(concat)</h3><p>1）为了方便用户浏览查询结果数据，有时需要设置查询结果的显示格式，可以使用CONCAT函数来连接字符串。</p><ul><li>语法</li></ul><figure class="highlight plaintext"><table><tr><td class="gutter"><pre><span class="line">1</span><br></pre></td><td class="code"><pre><span class="line">concat(字符串1,字符串3,....)</span><br></pre></td></tr></table></figure><ul><li>实战</li></ul><figure class="highlight plaintext"><table><tr><td class="gutter"><pre><span class="line">1</span><br></pre></td><td class="code"><pre><span class="line">select concat(productName,&quot;商品的单价为:&quot;,saleprice) from product</span><br></pre></td></tr></table></figure><h3 id="5-5过滤查询-where"><a href="#5-5过滤查询-where" class="headerlink" title="5.5过滤查询(where)"></a>5.5过滤查询(where)</h3><p>1.使用where子句限定返回的记录</p><ul><li>语法</li></ul><figure class="highlight plaintext"><table><tr><td class="gutter"><pre><span class="line">1</span><br></pre></td><td class="code"><pre><span class="line">select &lt;selectlist&gt; from 表名 where 条件</span><br></pre></td></tr></table></figure><h3 id="5-6比较运算符-x3D-gt-gt-x3D-lt-lt-x3D-x3D"><a href="#5-6比较运算符-x3D-gt-gt-x3D-lt-lt-x3D-x3D" class="headerlink" title="5.6比较运算符(&#x3D;,&gt;,&gt;&#x3D;,&lt;,&lt;&#x3D;,!&#x3D;)"></a>5.6比较运算符(&#x3D;,&gt;,&gt;&#x3D;,&lt;,&lt;&#x3D;,!&#x3D;)</h3><ul><li>实战</li></ul><figure class="highlight plaintext"><table><tr><td class="gutter"><pre><span class="line">1</span><br><span class="line">2</span><br><span class="line">3</span><br><span class="line">4</span><br><span class="line">5</span><br></pre></td><td class="code"><pre><span class="line">// 查询商品名为 罗技G9X 的货品信息</span><br><span class="line">SELECT * FROM product WHERE productName = &quot;罗技G9X&quot;;</span><br><span class="line">// 查询批发价大于350的货品信息（折扣价 = 销售价*折扣）</span><br><span class="line">SELECT *, salePrice * discount FROM product WHERE salePrice * discount &gt; 350;</span><br><span class="line"></span><br></pre></td></tr></table></figure><h3 id="5-7逻辑运算符-and-or-not"><a href="#5-7逻辑运算符-and-or-not" class="headerlink" title="5.7逻辑运算符(and,or,not)"></a>5.7逻辑运算符(and,or,not)</h3><p>1）<strong>AND</strong>：如果组合的田间都是 true，返回true；<br>2）<strong>OR</strong>：如果组合的条件之一是true，返回true；<br>3）<strong>NOT</strong>：如果给出的条件是false，返回true；如果给出的条件是true，则返回false。</p><ul><li>实战</li></ul><figure class="highlight plaintext"><table><tr><td class="gutter"><pre><span class="line">1</span><br><span class="line">2</span><br><span class="line">3</span><br><span class="line">4</span><br><span class="line">5</span><br><span class="line">6</span><br><span class="line">7</span><br></pre></td><td class="code"><pre><span class="line">// 查询售价在300-400（包括300和400）的货品信息</span><br><span class="line">SELECT * FROM product WHERE salePrice &gt;= 300 ADN salePrice &lt;= 400;</span><br><span class="line">// 查询分类编号为2, 4的所有货品信息</span><br><span class="line">SELECT * FROM product WHERE dir_id = 2 OR dir_id = 4;</span><br><span class="line">// 查询编号不为2的所有商品信息</span><br><span class="line">SELECT * FROM product WHERE NOT dir_id = 2</span><br><span class="line"></span><br></pre></td></tr></table></figure><h3 id="5-8-范围和集合（BETWEEN-AND）"><a href="#5-8-范围和集合（BETWEEN-AND）" class="headerlink" title="5.8 范围和集合（BETWEEN AND）"></a>5.8 范围和集合（BETWEEN AND）</h3><p>1）<strong>范围匹配</strong>：<strong>BETWEEN AND</strong> 运算符，一般使用在数字类型的范围上。但对于字符数据和日期类型同样可用。<br>注意：BETWEE AND 使用的是闭区间。</p><ul><li>语法</li></ul><figure class="highlight plaintext"><table><tr><td class="gutter"><pre><span class="line">1</span><br><span class="line">2</span><br></pre></td><td class="code"><pre><span class="line">// 使用的是闭区间，也就是包括minValue 和 maxValue</span><br><span class="line">WHERE 列名 BETWEEN minValue AND maxValue;</span><br></pre></td></tr></table></figure><ul><li>实战</li></ul><figure class="highlight plaintext"><table><tr><td class="gutter"><pre><span class="line">1</span><br><span class="line">2</span><br></pre></td><td class="code"><pre><span class="line">// 查询零售价不在 300 - 400 之间的货品信息</span><br><span class="line">SELECT * FROM product WHERE NOT salePrice BETWEEN 300 AND 400;</span><br></pre></td></tr></table></figure><p>2）<strong>集合查询</strong>：使用 <strong>IN</strong> 运算符，判断列的值是否在指定的集合中。</p><ul><li>语法</li></ul><figure class="highlight plaintext"><table><tr><td class="gutter"><pre><span class="line">1</span><br></pre></td><td class="code"><pre><span class="line">WHERE 列名 IN (值1, 值2, ...);</span><br></pre></td></tr></table></figure><ul><li>实战</li></ul><figure class="highlight plaintext"><table><tr><td class="gutter"><pre><span class="line">1</span><br><span class="line">2</span><br><span class="line">3</span><br><span class="line">4</span><br><span class="line">5</span><br></pre></td><td class="code"><pre><span class="line">// 查询分类编号为 2，4 的所有货品的 id，货品名称</span><br><span class="line">SELECT id, productName FROM product WHERE dir_id IN (2,4);</span><br><span class="line">// 查询分类编号不为 2, 4 的所有货品的 id，货品名称</span><br><span class="line">SELECT id, dir_id, productName FROM product WHERE NOT dir_id IN (2,4);</span><br><span class="line"></span><br></pre></td></tr></table></figure><h3 id="5-9-判空（IS-NULL"><a href="#5-9-判空（IS-NULL" class="headerlink" title="5.9 判空（IS NULL)"></a>5.9 判空（IS NULL)</h3><p>1）<strong>IS NULL</strong>：判断列的值是否为空值，非空字符串，空字符串使用 &#x3D;&#x3D; 判断；</p><ul><li>语法</li></ul><figure class="highlight plaintext"><table><tr><td class="gutter"><pre><span class="line">1</span><br></pre></td><td class="code"><pre><span class="line">WHERE 列名 IS NULL;</span><br></pre></td></tr></table></figure><ul><li>实战</li></ul><figure class="highlight plaintext"><table><tr><td class="gutter"><pre><span class="line">1</span><br><span class="line">2</span><br><span class="line">3</span><br></pre></td><td class="code"><pre><span class="line">// 查询商品名为NULL的所有商品信息</span><br><span class="line">SELECT * FROM product WHERE productName IS NULL;</span><br><span class="line">SELECT * FROM product WHERE supplier = &quot;&quot;;</span><br></pre></td></tr></table></figure><p><strong>结论</strong>：使用 &#x3D; 来判断只能判断空字符串，不能判断 null；而使用 IS NULL 只能判断 null 值，不能判断空字符串。</p><h3 id="5-10-模糊匹配查询（LIKE，-，-）"><a href="#5-10-模糊匹配查询（LIKE，-，-）" class="headerlink" title="5.10 模糊匹配查询（LIKE，%，_）"></a>5.10 模糊匹配查询（LIKE，%，_）</h3><p>1）<strong>LIKE</strong>：模糊查询数据使用 LIKE 运算执行通配符；<br>2）<strong>通配符</strong>：% 表示可有零个或多个任意字符; _ 便是需要一个任意字符；</p><ul><li>语法</li></ul><figure class="highlight plaintext"><table><tr><td class="gutter"><pre><span class="line">1</span><br><span class="line">2</span><br></pre></td><td class="code"><pre><span class="line">WHERE 列名 LIKE &quot;%M_&quot;;</span><br><span class="line"></span><br></pre></td></tr></table></figure><ul><li>实战</li></ul><figure class="highlight plaintext"><table><tr><td class="gutter"><pre><span class="line">1</span><br><span class="line">2</span><br></pre></td><td class="code"><pre><span class="line">// 查询货品名称以 罗技M9* 结尾的所有货品信息，这里的 * 表示一个任意字符，它不具备任何意义，只是我出于题目需要才这样写，便于你理解而已</span><br><span class="line">SELECT * FROM product WHERE productName LIKE &quot;%罗技M9_&quot;;</span><br></pre></td></tr></table></figure><h3 id="5-11-结果排序（ORDER-BY）"><a href="#5-11-结果排序（ORDER-BY）" class="headerlink" title="5.11 结果排序（ORDER BY）"></a>5.11 结果排序（ORDER BY）</h3><p>1）<strong>ORDER BY</strong>：使用 ORDER BY子句将查询结果进行排序，ORDER BY子句出现在 SELECT 语句的最后；<br>2）<strong>ASC</strong>：升序；<strong>DESC</strong>：降序；</p><ul><li>实战</li></ul><figure class="highlight plaintext"><table><tr><td class="gutter"><pre><span class="line">1</span><br><span class="line">2</span><br></pre></td><td class="code"><pre><span class="line">// 查询 id，货品名称，分类编号，零售价 按分类编号降序排序，如果分类编号相同再按零售价升序排序</span><br><span class="line">SELECT * FROM product ORDER BY dir_id DESC, salePrice ASC;</span><br></pre></td></tr></table></figure><h3 id="5-12-分组查询（GROUP-BY）"><a href="#5-12-分组查询（GROUP-BY）" class="headerlink" title="5.12 分组查询（GROUP BY）"></a>5.12 分组查询（GROUP BY）</h3><p>1）<strong>Group By</strong>：分组查询，一般与<strong>having</strong>一起用，查询的参数只能是统计函数和分组的条件参数，或者是聚合函数，having 后面的条件只能是分组查询的字段或者统计函数；</p><ul><li>实战</li></ul><figure class="highlight plaintext"><table><tr><td class="gutter"><pre><span class="line">1</span><br><span class="line">2</span><br><span class="line">3</span><br></pre></td><td class="code"><pre><span class="line"># 查询分组条件之外的值，拼接成字符串</span><br><span class="line">select theme_id, group_concat(dest_id) dest_id, group_concat(dest_name) dest_name from strategy group by theme_id having theme_id = 1</span><br><span class="line"></span><br></pre></td></tr></table></figure><h3 id="5-13-DQL字句的执行顺序"><a href="#5-13-DQL字句的执行顺序" class="headerlink" title="5.13 DQL字句的执行顺序"></a>5.13 DQL字句的执行顺序</h3><p>1）FROM字句：从哪张表中去查数据；<br>2）JOIN table：先确定表，在确定关联条件；<br>3）ON 条件：表绑定条件；<br>4）WHERE字句：筛选需要的行数据；<br>5）GROUP BY子句：分组操作；<br>6）HAVING：对分组后的记录进行聚合；<br>7）SELECT字句：筛选需要显示的列数据；（对字段 AS 起别名是在这时候，所以 WHERE 中不能用字段的别名，ORDER BY 中可以使用别名）；<br>8）DISTINCT：去重；<br>9）ORDER BY子句：排序操作；<br>10）LIMIT子句：限制条件；</p><h2 id="6-统计函数"><a href="#6-统计函数" class="headerlink" title="6.统计函数"></a>6.统计函数</h2><h3 id="6-1-常用关键字-COUNT、SUM、MAX、MIN、AVG）"><a href="#6-1-常用关键字-COUNT、SUM、MAX、MIN、AVG）" class="headerlink" title="6.1 常用关键字(COUNT、SUM、MAX、MIN、AVG）"></a>6.1 常用关键字(COUNT、SUM、MAX、MIN、AVG）</h3><p>概念<br>1）COUNT(*)：统计表中有多少条数据；<br>2）SUM(列)：汇总列的总和；<br>3）MAX(列)：获取某一列的最大值；<br>4）MIN(列)：获取某一列的最小值；<br>5）AVG(列)：获取某一列的平均值；</p><ul><li>实战</li></ul><figure class="highlight plaintext"><table><tr><td class="gutter"><pre><span class="line">1</span><br><span class="line">2</span><br><span class="line">3</span><br><span class="line">4</span><br><span class="line">5</span><br></pre></td><td class="code"><pre><span class="line">// 查询货品表共有多少数据</span><br><span class="line">SELECT COUNT(*) FROM product;</span><br><span class="line">// 计算所有货品的销售价</span><br><span class="line">SELECT SUM(costPrice) FROM product;</span><br><span class="line"></span><br></pre></td></tr></table></figure>]]></content>


    <summary type="html">&lt;h2 id=&quot;1-基本概念&quot;&gt;&lt;a href=&quot;#1-基本概念&quot; class=&quot;headerlink&quot; title=&quot;1.基本概念&quot;&gt;&lt;/a&gt;1.基本概念&lt;/h2&gt;&lt;ul&gt;
&lt;li&gt;数据库的概念&lt;/li&gt;
&lt;/ul&gt;
&lt;p&gt;​			1）结构化查询语言（Structured Qu</summary>


    <category term="mysql语法" scheme="http://rs-zt.github.io/tags/mysql%E8%AF%AD%E6%B3%95/"/>
    
  </entry>
  
  <entry>
    <title>IDEA2022.1版本破解方法</title>
    <link href="http://rs-zt.github.io/2023/07/12/IDEA2022-1%E7%89%88%E6%9C%AC%E7%A0%B4%E8%A7%A3%E6%96%B9%E6%B3%95/"/>
    <id>http://rs-zt.github.io/2023/07/12/IDEA2022-1%E7%89%88%E6%9C%AC%E7%A0%B4%E8%A7%A3%E6%96%B9%E6%B3%95/</id>
    <published>2023-07-12T11:32:29.000Z</published>
    <updated>2023-07-13T06:13:27.631Z</updated>
    
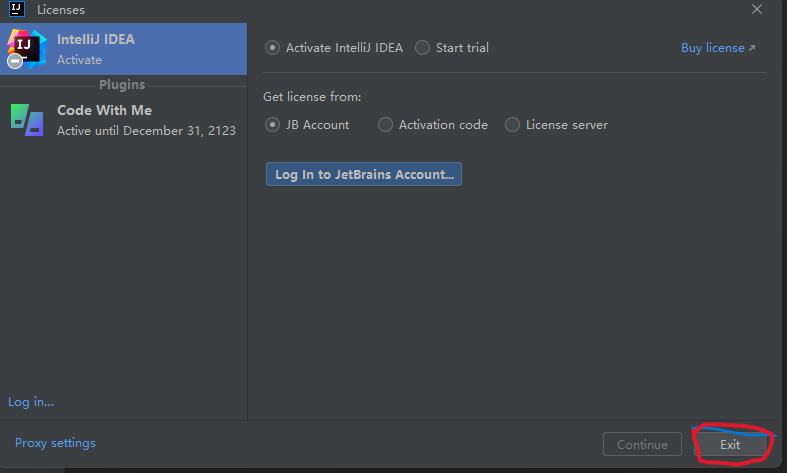
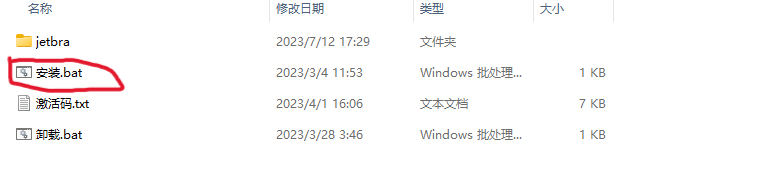
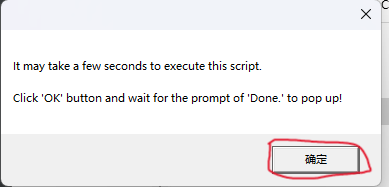
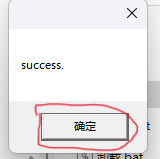
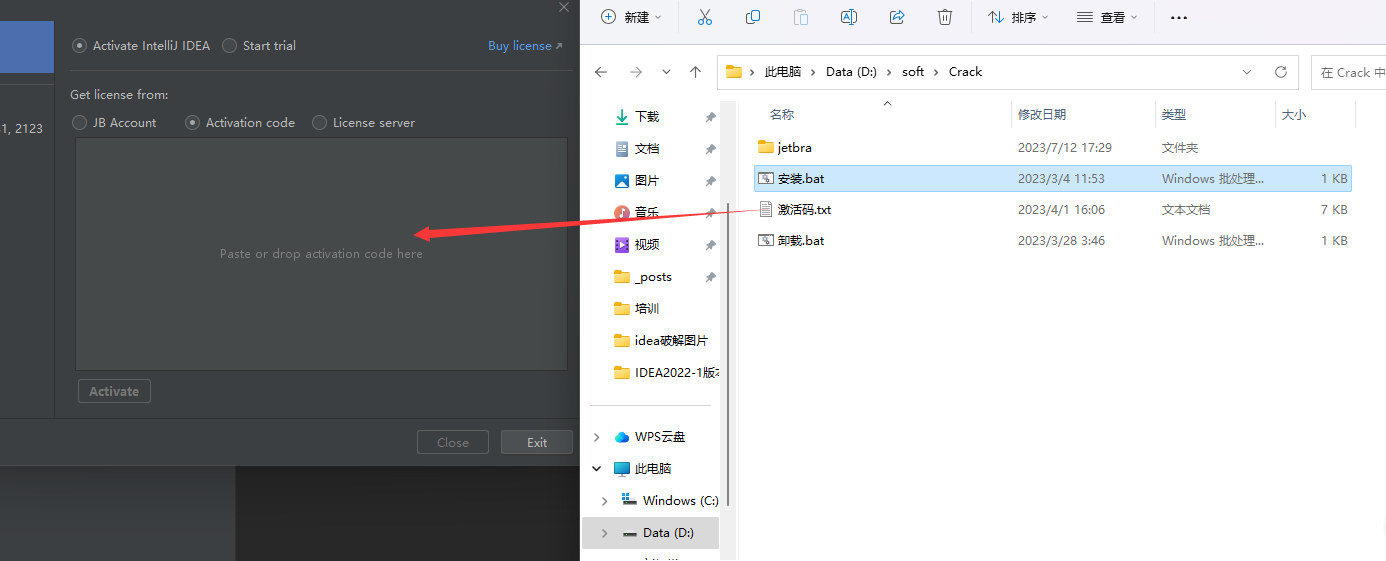
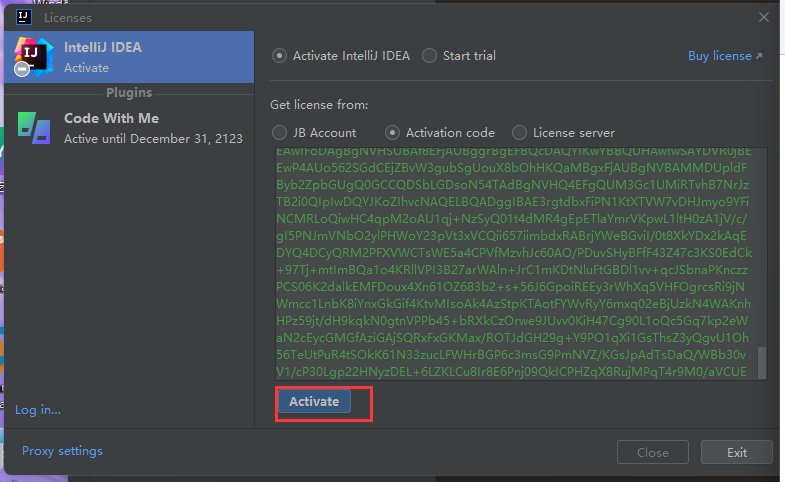
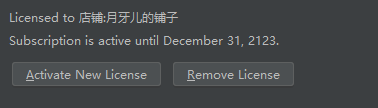
    <content type="html"><![CDATA[<h1 id="前言"><a href="#前言" class="headerlink" title="前言"></a>前言</h1><p>本篇文章是基于win10系统下载安装IntelliJ IDEA 2022.1的教程。本教程适用于 JetBrains 全家桶最新版本，包括 IDEA、Pycharm、WebStorm、PhpStorm、AppCode 等。支持最新版IDEA 2022.1；同样适用于2018、2019、2020、2021等其他各版本</p><p>一、下载IDEA</p><p>IDEA官网：<a class="link" href="https://links.jianshu.com/go?to=https://www.jetbrains.com/idea/download/%23section=windows">https://www.jetbrains.com/idea/download/#section=windows<i class="fas fa-external-link-alt"></i></a><br> IDEA中文官网：<a class="link" href="https://links.jianshu.com/go?to=https://www.jetbrains.com/zh-cn/idea/download/%23section=windows">https://www.jetbrains.com/zh-cn/idea/download/#section=windows<i class="fas fa-external-link-alt"></i></a></p><img lazyload alt="image" data-src="/2023/07/12/IDEA2022-1%E7%89%88%E6%9C%AC%E7%A0%B4%E8%A7%A3%E6%96%B9%E6%B3%95/1.png" class> <h1 id="二、安装IDEA"><a href="#二、安装IDEA" class="headerlink" title="二、安装IDEA"></a>二、安装IDEA</h1><h2 id="1-双击-exe文件"><a href="#1-双击-exe文件" class="headerlink" title="1.双击 .exe文件"></a>1.双击 .exe文件</h2><h2 id="2-选择安装路径"><a href="#2-选择安装路径" class="headerlink" title="2.选择安装路径"></a>2.选择安装路径</h2><h5 id="注意-根据自己需求更改路径地址"><a href="#注意-根据自己需求更改路径地址" class="headerlink" title="注意:根据自己需求更改路径地址"></a><strong>注意:根据自己需求更改路径地址</strong></h5><img lazyload alt="image" data-src="/2023/07/12/IDEA2022-1%E7%89%88%E6%9C%AC%E7%A0%B4%E8%A7%A3%E6%96%B9%E6%B3%95/3.png" class><h2 id="3-选择安装选项"><a href="#3-选择安装选项" class="headerlink" title="3.选择安装选项"></a>3.选择安装选项</h2><img lazyload alt="image" data-src="/2023/07/12/IDEA2022-1%E7%89%88%E6%9C%AC%E7%A0%B4%E8%A7%A3%E6%96%B9%E6%B3%95/4.png" class><h2 id="4-等待安装"><a href="#4-等待安装" class="headerlink" title="4.等待安装"></a>4.等待安装</h2><p>安装完成后，可以选择立即重启（这里会重启电脑）</p><img lazyload alt="image" data-src="/2023/07/12/IDEA2022-1%E7%89%88%E6%9C%AC%E7%A0%B4%E8%A7%A3%E6%96%B9%E6%B3%95/5.png" class><h1 id="三、配置IDEA激活插件"><a href="#三、配置IDEA激活插件" class="headerlink" title="三、配置IDEA激活插件"></a>三、配置IDEA激活插件</h1><h2 id="1-双击软件"><a href="#1-双击软件" class="headerlink" title="1.双击软件"></a>1.双击软件</h2><h2 id="2-直接点击exit退出-先不用管"><a href="#2-直接点击exit退出-先不用管" class="headerlink" title="2.直接点击exit退出,先不用管"></a>2.直接点击exit退出,先不用管</h2><img lazyload alt="image" data-src="/2023/07/12/IDEA2022-1%E7%89%88%E6%9C%AC%E7%A0%B4%E8%A7%A3%E6%96%B9%E6%B3%95/6.png" class><h2 id="3-下载破解包并解压"><a href="#3-下载破解包并解压" class="headerlink" title="3.下载破解包并解压"></a>3.下载破解包并解压</h2><h4 id="注意-路径不要含有中文和特殊字符"><a href="#注意-路径不要含有中文和特殊字符" class="headerlink" title="注意:路径不要含有中文和特殊字符"></a>注意:路径不要含有中文和特殊字符</h4><figure class="highlight java"><table><tr><td class="gutter"><pre><span class="line">1</span><br><span class="line">2</span><br></pre></td><td class="code"><pre><span class="line">链接：https:<span class="comment">//pan.baidu.com/s/1OMbi9muI4nCuLBsBNRcNyg?pwd=rs12 </span></span><br><span class="line">提取码：rs12</span><br></pre></td></tr></table></figure><h2 id="4-打开破解包并点击-安装-bat"><a href="#4-打开破解包并点击-安装-bat" class="headerlink" title="4.打开破解包并点击  安装.bat"></a>4.打开破解包并点击  <strong>安装.bat</strong></h2><img lazyload alt="image" data-src="/2023/07/12/IDEA2022-1%E7%89%88%E6%9C%AC%E7%A0%B4%E8%A7%A3%E6%96%B9%E6%B3%95/7.png" class><h2 id="5-点击确定"><a href="#5-点击确定" class="headerlink" title="5.点击确定"></a>5.点击确定</h2><img lazyload alt="image" data-src="/2023/07/12/IDEA2022-1%E7%89%88%E6%9C%AC%E7%A0%B4%E8%A7%A3%E6%96%B9%E6%B3%95/QQ%E6%88%AA%E5%9B%BE20230712201138.png" class><h2 id="6-点击确定"><a href="#6-点击确定" class="headerlink" title="6.点击确定"></a>6.点击确定</h2><img lazyload alt="image" data-src="/2023/07/12/IDEA2022-1%E7%89%88%E6%9C%AC%E7%A0%B4%E8%A7%A3%E6%96%B9%E6%B3%95/9.png" class><h2 id="7-打开IDEA-然后把激活码拖到指定区域-最后点击activate"><a href="#7-打开IDEA-然后把激活码拖到指定区域-最后点击activate" class="headerlink" title="7.打开IDEA,然后把激活码拖到指定区域,最后点击activate"></a>7.打开IDEA,然后把激活码拖到指定区域,最后点击activate</h2><img lazyload alt="image" data-src="/2023/07/12/IDEA2022-1%E7%89%88%E6%9C%AC%E7%A0%B4%E8%A7%A3%E6%96%B9%E6%B3%95/10.png" class><img lazyload alt="image" data-src="/2023/07/12/IDEA2022-1%E7%89%88%E6%9C%AC%E7%A0%B4%E8%A7%A3%E6%96%B9%E6%B3%95/12.png" class><h2 id="8-最后显示如下图表示破解成功"><a href="#8-最后显示如下图表示破解成功" class="headerlink" title="8.最后显示如下图表示破解成功"></a>8.最后显示如下图表示破解成功</h2><img lazyload alt="image" data-src="/2023/07/12/IDEA2022-1%E7%89%88%E6%9C%AC%E7%A0%B4%E8%A7%A3%E6%96%B9%E6%B3%95/14.png" class><h3 id="注意-以上破解针对于IDEA2022-1版本-如果是其他版本此方法不同-本人建议去以下网址自行摸索破解"><a href="#注意-以上破解针对于IDEA2022-1版本-如果是其他版本此方法不同-本人建议去以下网址自行摸索破解" class="headerlink" title="注意:以上破解针对于IDEA2022.1版本,如果是其他版本此方法不同,本人建议去以下网址自行摸索破解"></a>注意:以上破解针对于IDEA2022.1版本,如果是其他版本此方法不同,本人建议去以下网址自行摸索破解</h3><figure class="highlight java"><table><tr><td class="gutter"><pre><span class="line">1</span><br></pre></td><td class="code"><pre><span class="line">https:<span class="comment">//www.exception.site/</span></span><br></pre></td></tr></table></figure>]]></content>


    <summary type="html">&lt;h1 id=&quot;前言&quot;&gt;&lt;a href=&quot;#前言&quot; class=&quot;headerlink&quot; title=&quot;前言&quot;&gt;&lt;/a&gt;前言&lt;/h1&gt;&lt;p&gt;本篇文章是基于win10系统下载安装IntelliJ IDEA 2022.1的教程。本教程适用于 JetBrains 全家桶最新版本，包括 </summary>


    <category term="IDEA" scheme="http://rs-zt.github.io/tags/IDEA/"/>
    
  </entry>
  
  <entry>
    <title>IDEA(破解方法)</title>
    <link href="http://rs-zt.github.io/2023/07/12/IDEA-%E7%A0%B4%E8%A7%A3%E6%96%B9%E6%B3%95/"/>
    <id>http://rs-zt.github.io/2023/07/12/IDEA-%E7%A0%B4%E8%A7%A3%E6%96%B9%E6%B3%95/</id>
    <published>2023-07-12T09:34:15.000Z</published>
    <updated>2023-07-12T09:36:25.930Z</updated>
    
    <content type="html"><![CDATA[<h3 id="IntelliJ-IDEA-2022-1永久破解激活教程（最新版，亲测可用）"><a href="#IntelliJ-IDEA-2022-1永久破解激活教程（最新版，亲测可用）" class="headerlink" title="IntelliJ IDEA 2022.1永久破解激活教程（最新版，亲测可用）"></a>IntelliJ IDEA 2022.1永久破解激活教程（最新版，亲测可用）</h3><h3 id="前言"><a href="#前言" class="headerlink" title="前言"></a>前言</h3><p>本篇文章是基于win10系统下载安装IntelliJ IDEA 2022.1的教程。本教程适用于 JetBrains 全家桶最新版本，包括 IDEA、Pycharm、WebStorm、PhpStorm、AppCode 等。支持最新版IDEA 2022.1；同样适用于2018、2019、2020、2021等其他各版本</p><h3 id="一、下载IDEA"><a href="#一、下载IDEA" class="headerlink" title="一、下载IDEA"></a>一、下载IDEA</h3><p>IDEA官网：<a class="link" href="https://links.jianshu.com/go?to=https://www.jetbrains.com/idea/download/%23section=windows">https://www.jetbrains.com/idea/download/#section=windows<i class="fas fa-external-link-alt"></i></a><br> IDEA中文官网：<a class="link" href="https://links.jianshu.com/go?to=https://www.jetbrains.com/zh-cn/idea/download/%23section=windows">https://www.jetbrains.com/zh-cn/idea/download/#section=windows<i class="fas fa-external-link-alt"></i></a></p><p><img lazyload alt="image" data-src="C:\Users\Rs\Pictures\idea破解图片\20036084-da8c23c8e278776b.webp"></p><h3 id="二、安装IDEA"><a href="#二、安装IDEA" class="headerlink" title="二、安装IDEA"></a>二、安装IDEA</h3><h4 id="1-双击-exe文件"><a href="#1-双击-exe文件" class="headerlink" title="1.双击 .exe文件"></a>1.双击 .exe文件</h4><h4 id="2-选择安装路径"><a href="#2-选择安装路径" class="headerlink" title="2.选择安装路径"></a>2.选择安装路径</h4><h4 id="3-选择安装选项"><a href="#3-选择安装选项" class="headerlink" title="3.选择安装选项"></a>3.选择安装选项</h4><p><img lazyload alt="image" data-src="C:\Users\Rs\Pictures\idea破解图片\20036084-2a08cf818f83287b.webp"></p><h4 id="4-等待安装"><a href="#4-等待安装" class="headerlink" title="4.等待安装"></a>4.等待安装</h4><p>安装完成后，可以选择立即重启（这里会重启电脑）</p><h3 id="三、配置IDEA激活插件"><a href="#三、配置IDEA激活插件" class="headerlink" title="三、配置IDEA激活插件"></a>三、配置IDEA激活插件</h3><h4 id="1-启动IDEA并登录试用"><a href="#1-启动IDEA并登录试用" class="headerlink" title="1.启动IDEA并登录试用"></a>1.启动IDEA并登录试用</h4><p>必须登录才能试用，点击登录跳转到登录界面，没有账号可以先注册账号，忘记密码可以先找回</p><p><img lazyload alt="image" data-src="C:\Users\Rs\Pictures\idea破解图片\20036084-85d2de00ca66da8f.webp"></p><p>登录成功后点击开始试用，可以看到试用到期日。（一般是可以自动同步，如没有同步，可以再次点击Log in）</p><p><img lazyload alt="image" data-src="C:\Users\Rs\Pictures\idea破解图片\20036084-ab5c12acad9b35e2.webp"></p><h3 id="2-初次试用，新建项目，进入软件控制台"><a href="#2-初次试用，新建项目，进入软件控制台" class="headerlink" title="2.初次试用，新建项目，进入软件控制台"></a>2.初次试用，新建项目，进入软件控制台</h3><p>如果是初次试用，可以点击New Project，新建一个项目，进入软件控制台</p><p><img lazyload alt="image" data-src="C:\Users\Rs\Pictures\idea破解图片\20036084-bddaf61981a450cf.webp"></p><p>如果是第一次构建项目，并且Maven本地仓库没有依赖，那么构建时间可能会比较久；Maven的下载与安装配置可以参照：</p><h4 id="3-插件下载"><a href="#3-插件下载" class="headerlink" title="3.插件下载"></a>3.插件下载</h4><figure class="highlight java"><table><tr><td class="gutter"><pre><span class="line">1</span><br><span class="line">2</span><br></pre></td><td class="code"><pre><span class="line">链接：https:<span class="comment">//pan.baidu.com/s/1jr-lrsA6hWcSzdnSQjyPyA </span></span><br><span class="line">提取码：wsnk</span><br></pre></td></tr></table></figure><h3 id="4-配置插件"><a href="#4-配置插件" class="headerlink" title="4.配置插件"></a>4.配置插件</h3><p><strong>需要找到配置文件：idea64.exe.vmoptions</strong></p><h6 id="4-1-1、查找方式一"><a href="#4-1-1、查找方式一" class="headerlink" title="4.1.1、查找方式一"></a>4.1.1、查找方式一</h6><p>如果能正常进入工具，就使用此方式；如果试用期已过，无法打开IDEA，请参考 【4.1.2、查找方式二】</p><p><img lazyload alt="image" data-src="C:\Users\Rs\Pictures\idea破解图片\20036084-7acf92ed24987be0.webp"></p><h6 id="4-1-2、查找方式二"><a href="#4-1-2、查找方式二" class="headerlink" title="4.1.2、查找方式二"></a>4.1.2、查找方式二</h6><p><strong>用户目录下找到 idea64.exe.vmoptions</strong><br>注意：AppData目录为隐藏目录，需要手动输入，或通过取消勾选以下选项显示隐藏文件夹</p><p><img lazyload alt="image" data-src="C:\Users\Rs\Pictures\idea破解图片\20036084-ed1f0423060c9f8a.webp"></p><p>示例路径</p><p><img lazyload alt="image" data-src="C:\Users\Rs\Pictures\idea破解图片\20036084-a81702ede969b9be.webp"></p><h6 id="4-3、移除其他插件"><a href="#4-3、移除其他插件" class="headerlink" title="4.3、移除其他插件"></a>4.3、移除其他插件</h6><p>如果之前使用过其他插件，请使用 #注释，或者在 settings→plugin→installed 中将其他失效的激活插件卸载</p><h6 id="4-4、编辑-idea64-exe-vmoptions配置文件"><a href="#4-4、编辑-idea64-exe-vmoptions配置文件" class="headerlink" title="4.4、编辑 idea64.exe.vmoptions配置文件"></a>4.4、编辑 idea64.exe.vmoptions配置文件</h6><p><code>-javaagent:你的本地路径\ja-netfilter.jar</code><br> 示例：<code>-javaagent:E:\IDEA\Plugins\ja-netfilter.jar</code><br> IDEA中配置后的效果</p><p><img lazyload alt="image" data-src="C:\Users\Rs\Pictures\idea破解图片\QQ截图20230712153631.png"></p><h6 id="4-5、一定要重启软件（重要）"><a href="#4-5、一定要重启软件（重要）" class="headerlink" title="4.5、一定要重启软件（重要）"></a>4.5、一定要重启软件（重要）</h6><h6 id="4-5-1、插件配置后无法启动"><a href="#4-5-1、插件配置后无法启动" class="headerlink" title="4.5.1、插件配置后无法启动"></a>4.5.1、插件配置后无法启动</h6><p>如果配置完插件，导致软件无法启动，原因就是插件配置错误导致的，请通过上面的【4.1.2、查找方式二】在用户目录中找到对应的配置文件，将插件的配置项调整正确或者通过 #号注释，再重启</p><h3 id="5-在线激活"><a href="#5-在线激活" class="headerlink" title="5.在线激活"></a>5.在线激活</h3><p>打开激活界面：Help→Register</p><p><img lazyload alt="image" data-src="C:\Users\Rs\Pictures\idea破解图片\20036084-92447bc33df103c9.webp"></p><p>在线激活地址：<a class="link" href="https://links.jianshu.com/go?to=https://jetbra.in">https://jetbra.in<i class="fas fa-external-link-alt"></i></a></p><p><img lazyload alt="image" data-src="https://upload-images.jianshu.io/upload_images/20036084-45d00ecdccf92cb9.png?imageMogr2/auto-orient/strip%7CimageView2/2/w/774/format/webp"></p><p>激活成功效果：授权给 用户名 （我重启软件时，自动安装了插件，变成了中文，这里推荐还是使用英文界面）</p><p><img lazyload alt="image" data-src="https://upload-images.jianshu.io/upload_images/20036084-5634abbfe84db4ac.png?imageMogr2/auto-orient/strip%7CimageView2/2/w/566/format/webp"></p><p>在步骤【4.4】时，图中配置命令最前面少了”-“，所以出现如下错误信息，加上”-“再重启软件即可</p><p><img lazyload alt="image" data-src="https://upload-images.jianshu.io/upload_images/20036084-54cb42223eb6f858.png?imageMogr2/auto-orient/strip%7CimageView2/2/w/786/format/webp"></p><p>image.png</p><h3 id="6-激活失败原因"><a href="#6-激活失败原因" class="headerlink" title="6.激活失败原因"></a>6.激活失败原因</h3><p>原因一：插件配置错误，请核对<br> 原因二：插件配置完没有重启！重启之后再进行操作<br> 原因三：因为是在线的，受网络影响，可能出现链接错误，可多点击几次Activate尝试（这个失败我没有出现过，没有办法贴图）</p><h3 id="7-激活成功"><a href="#7-激活成功" class="headerlink" title="7.激活成功"></a>7.激活成功</h3><p>点击help→about，出现如下界面，即是激活成功</p><p><img lazyload alt="image" data-src="https://upload-images.jianshu.io/upload_images/20036084-cdb1a2e603f2717a.png?imageMogr2/auto-orient/strip%7CimageView2/2/w/430/format/webp"></p>]]></content>


    <summary type="html">&lt;h3 id=&quot;IntelliJ-IDEA-2022-1永久破解激活教程（最新版，亲测可用）&quot;&gt;&lt;a href=&quot;#IntelliJ-IDEA-2022-1永久破解激活教程（最新版，亲测可用）&quot; class=&quot;headerlink&quot; title=&quot;IntelliJ IDEA 20</summary>


    <category term="IDEA" scheme="http://rs-zt.github.io/tags/IDEA/"/>
    
  </entry>
  
  <entry>
    <title>mysql练习题</title>
    <link href="http://rs-zt.github.io/2023/07/11/mysql%E7%BB%83%E4%B9%A0%E9%A2%98/"/>
    <id>http://rs-zt.github.io/2023/07/11/mysql%E7%BB%83%E4%B9%A0%E9%A2%98/</id>
    <published>2023-07-11T14:41:57.000Z</published>
    <updated>2023-07-11T14:42:38.683Z</updated>
    
    <content type="html"><![CDATA[<p>1.查出在10部门的员工名字,工资</p><figure class="highlight plaintext"><table><tr><td class="gutter"><pre><span class="line">1</span><br></pre></td><td class="code"><pre><span class="line">select ename,salary from emp where deptno=10</span><br></pre></td></tr></table></figure><p>2.找出工资大于1200元的员工全名、工资、职称</p><figure class="highlight plaintext"><table><tr><td class="gutter"><pre><span class="line">1</span><br></pre></td><td class="code"><pre><span class="line">select ename,salary,job from emp where salary &gt;1200</span><br></pre></td></tr></table></figure><p>3.查出在10，30部门的员工名,薪水</p><figure class="highlight plaintext"><table><tr><td class="gutter"><pre><span class="line">1</span><br></pre></td><td class="code"><pre><span class="line">select ename,salary from emp where deptno=10 and 30</span><br></pre></td></tr></table></figure><p>4.找出工资大于1500并且没有提成的员工</p><figure class="highlight plaintext"><table><tr><td class="gutter"><pre><span class="line">1</span><br></pre></td><td class="code"><pre><span class="line">select * from emp where salary &gt;1500 and comm is null</span><br></pre></td></tr></table></figure><p>5.查出名字是以M打头的员工</p><figure class="highlight plaintext"><table><tr><td class="gutter"><pre><span class="line">1</span><br></pre></td><td class="code"><pre><span class="line">select *from emp where ename like &#x27;M%</span><br></pre></td></tr></table></figure><p>6.查出姓名中第三个字母是e的员工</p><figure class="highlight plaintext"><table><tr><td class="gutter"><pre><span class="line">1</span><br></pre></td><td class="code"><pre><span class="line">select * from emp where substr(ename,3,1)=&#x27;e&#x27;</span><br></pre></td></tr></table></figure><p>7.找出没有提成率的员工</p><figure class="highlight plaintext"><table><tr><td class="gutter"><pre><span class="line">1</span><br></pre></td><td class="code"><pre><span class="line">select * from emp where comm is null</span><br></pre></td></tr></table></figure><p>8.找出工资在950(含)至1200(含)元的员工姓名、职称</p><figure class="highlight plaintext"><table><tr><td class="gutter"><pre><span class="line">1</span><br></pre></td><td class="code"><pre><span class="line">select ename,job from emp where salary between 950 and 1200</span><br></pre></td></tr></table></figure><p>9.找出2月份入职的员工名、入职时间、工资</p><figure class="highlight plaintext"><table><tr><td class="gutter"><pre><span class="line">1</span><br></pre></td><td class="code"><pre><span class="line">select ename,hiredate,salary from emp where month(hiredate)=2</span><br></pre></td></tr></table></figure><p>查询出所有员工的职位，不重复</p><figure class="highlight plaintext"><table><tr><td class="gutter"><pre><span class="line">1</span><br></pre></td><td class="code"><pre><span class="line">select distinct job from emp </span><br></pre></td></tr></table></figure><p>查询出各个部门的员工数量</p><figure class="highlight plaintext"><table><tr><td class="gutter"><pre><span class="line">1</span><br></pre></td><td class="code"><pre><span class="line">select deptno,count(*) from emp group by deptno</span><br></pre></td></tr></table></figure><p>– 查询出各年份入职的员工情况（年份，员工人数）</p><figure class="highlight plaintext"><table><tr><td class="gutter"><pre><span class="line">1</span><br></pre></td><td class="code"><pre><span class="line">select year(hiredate) as year,count(*) from emp group by year(hiredate) order by year(hiredate)</span><br></pre></td></tr></table></figure><p>– 查询出每年每月入职的员工情况（年份月份，员工人数）</p><figure class="highlight plaintext"><table><tr><td class="gutter"><pre><span class="line">1</span><br></pre></td><td class="code"><pre><span class="line">select year(hiredate) as year, month(hiredate) as month,count(*) from emp group by year(hiredate),month(hiredate) order by year(hiredate),month(hiredate)</span><br></pre></td></tr></table></figure><p>【1. 字符函数】<br>    1.获得’goodmorning’ 的字符长度</p><figure class="highlight plaintext"><table><tr><td class="gutter"><pre><span class="line">1</span><br></pre></td><td class="code"><pre><span class="line">select length(&#x27;goodmoring&#x27;)</span><br></pre></td></tr></table></figure><p>​2.将Hello全部转换成小写字母</p><figure class="highlight plaintext"><table><tr><td class="gutter"><pre><span class="line">1</span><br></pre></td><td class="code"><pre><span class="line">select lower(&#x27;HellOKKK&#x27;)</span><br></pre></td></tr></table></figure><p>​3.将Hello全部转换成大写字母</p><figure class="highlight plaintext"><table><tr><td class="gutter"><pre><span class="line">1</span><br></pre></td><td class="code"><pre><span class="line">select upper(&#x27;Hello&#x27;)</span><br></pre></td></tr></table></figure><p>​4.将hello首字母变为大写字母</p><figure class="highlight plaintext"><table><tr><td class="gutter"><pre><span class="line">1</span><br></pre></td><td class="code"><pre><span class="line">select concat(upper(substring(&#x27;hello&#x27;,1,1)),substring(&#x27;hello&#x27;,2))</span><br></pre></td></tr></table></figure><p>​5.将’hello’ 与 ‘tom’  ,’good’拼接成一个单词</p><figure class="highlight plaintext"><table><tr><td class="gutter"><pre><span class="line">1</span><br></pre></td><td class="code"><pre><span class="line">select concat(&#x27;hello&#x27;,&#x27;tom&#x27;,&#x27;good&#x27;)</span><br></pre></td></tr></table></figure><p>​6.获得’goodmorning’ 的第4 个字母 </p><figure class="highlight plaintext"><table><tr><td class="gutter"><pre><span class="line">1</span><br></pre></td><td class="code"><pre><span class="line">select substring(&#x27;goodmorning&#x27;,4,1)</span><br></pre></td></tr></table></figure><p>​7.截取’goodmorning’ 的moring 单词</p><figure class="highlight plaintext"><table><tr><td class="gutter"><pre><span class="line">1</span><br></pre></td><td class="code"><pre><span class="line">select substring(&#x27;goodmorning&#x27;,5)</span><br></pre></td></tr></table></figure><p>​8.截取’Good  morning ！I’m Tom ‘   中的’o’ 用’A’来替代</p><figure class="highlight plaintext"><table><tr><td class="gutter"><pre><span class="line">1</span><br></pre></td><td class="code"><pre><span class="line">SELECT REPLACE(SUBSTRING(&#x27;Good  morning ! I\&#x27;m Tom &#x27;, LOCATE(&#x27;o&#x27;, &#x27;Good  morning ! I\&#x27;m Tom &#x27;)), &#x27;o&#x27;, &#x27;A&#x27;);</span><br></pre></td></tr></table></figure><p>【2. 日期函数】<br>1.获得当前日期</p><figure class="highlight plaintext"><table><tr><td class="gutter"><pre><span class="line">1</span><br></pre></td><td class="code"><pre><span class="line">select current_date()</span><br></pre></td></tr></table></figure><ol start="2"><li>获得某一个日期的年份，月份，日期</li></ol><figure class="highlight plaintext"><table><tr><td class="gutter"><pre><span class="line">1</span><br></pre></td><td class="code"><pre><span class="line">select year(date),month(date),day(date) from mytable where date=&#x27;2023-02-13&#x27;</span><br></pre></td></tr></table></figure><ol start="2"><li>获得某一个日期的星期</li></ol><figure class="highlight plaintext"><table><tr><td class="gutter"><pre><span class="line">1</span><br></pre></td><td class="code"><pre><span class="line">select datename(date) as weekday from mytable where date=&#x27;2023-04-11&#x27;</span><br></pre></td></tr></table></figure><ol start="2"><li>获得当前日期的时分秒</li></ol><figure class="highlight plaintext"><table><tr><td class="gutter"><pre><span class="line">1</span><br></pre></td><td class="code"><pre><span class="line">select time(now())</span><br></pre></td></tr></table></figure><ol start="2"><li>获得2天后的日期</li></ol><figure class="highlight plaintext"><table><tr><td class="gutter"><pre><span class="line">1</span><br></pre></td><td class="code"><pre><span class="line">select date_add(curdate(),interval 2 day)</span><br></pre></td></tr></table></figure><ol start="2"><li>获得前2天的日期</li></ol><figure class="highlight plaintext"><table><tr><td class="gutter"><pre><span class="line">1</span><br></pre></td><td class="code"><pre><span class="line">select date_sub(curdate(),interval 2day)</span><br></pre></td></tr></table></figure><ol start="2"><li>获得两个日期相差的年份，月份，天数</li></ol><figure class="highlight plaintext"><table><tr><td class="gutter"><pre><span class="line">1</span><br><span class="line">2</span><br><span class="line">3</span><br><span class="line">4</span><br></pre></td><td class="code"><pre><span class="line">select timestampdiff(year,date1,date2)as diff_year</span><br><span class="line">       timestampdiff(month,date1,date2)as diff_month</span><br><span class="line">       timestampdiff(day,date1,date2) as diff_day</span><br><span class="line">       from mytable</span><br></pre></td></tr></table></figure><p>【3. 数值函数】<br>1.获得38934.4383的整数部分</p><figure class="highlight plaintext"><table><tr><td class="gutter"><pre><span class="line">1</span><br></pre></td><td class="code"><pre><span class="line">select floor(&#x27;38934.4383&#x27;)</span><br></pre></td></tr></table></figure><p>2.将38934.4387的保留2位小数，不需要四舍五入,直接截取</p><figure class="highlight plaintext"><table><tr><td class="gutter"><pre><span class="line">1</span><br></pre></td><td class="code"><pre><span class="line">select truncate(38934.4387,2)</span><br></pre></td></tr></table></figure><p>3.将38934.4387的保留2位小数，需要四舍五入</p><figure class="highlight plaintext"><table><tr><td class="gutter"><pre><span class="line">1</span><br></pre></td><td class="code"><pre><span class="line">select round(38934.4387,2)</span><br></pre></td></tr></table></figure><p>4.获得不小于38934.4383的最小正整数</p><figure class="highlight plaintext"><table><tr><td class="gutter"><pre><span class="line">1</span><br></pre></td><td class="code"><pre><span class="line">select ceiling(38934.4383)</span><br></pre></td></tr></table></figure><p>5.获得不大于38934.4383的最大的正整数</p><figure class="highlight plaintext"><table><tr><td class="gutter"><pre><span class="line">1</span><br></pre></td><td class="code"><pre><span class="line">select floor(38934.4383)</span><br></pre></td></tr></table></figure>]]></content>


    <summary type="html">&lt;p&gt;1.查出在10部门的员工名字,工资&lt;/p&gt;
&lt;figure class=&quot;highlight plaintext&quot;&gt;&lt;table&gt;&lt;tr&gt;&lt;td class=&quot;gutter&quot;&gt;&lt;pre&gt;&lt;span class=&quot;line&quot;&gt;1&lt;/span&gt;&lt;br&gt;&lt;/pre&gt;&lt;/td&gt;&lt;t</summary>


    <category term="mysql练习题" scheme="http://rs-zt.github.io/tags/mysql%E7%BB%83%E4%B9%A0%E9%A2%98/"/>
    
  </entry>
  
  <entry>
    <title>Mysql的安装与配置</title>
    <link href="http://rs-zt.github.io/2023/07/11/Mysql%E7%9A%84%E5%AE%89%E8%A3%85%E4%B8%8E%E9%85%8D%E7%BD%AE/"/>
    <id>http://rs-zt.github.io/2023/07/11/Mysql%E7%9A%84%E5%AE%89%E8%A3%85%E4%B8%8E%E9%85%8D%E7%BD%AE/</id>
    <published>2023-07-11T14:38:09.000Z</published>
    <updated>2023-07-11T14:39:12.623Z</updated>
    
    <content type="html"><![CDATA[<h1 id="1-MySQL介绍"><a href="#1-MySQL介绍" class="headerlink" title="1. MySQL介绍"></a>1. MySQL介绍</h1><blockquote><ol><li>mysql属于瑞典的Mysql AB公司的,隶属于Oracle(甲骨文,主打的产品oracle数据库)旗下产品.</li><li>mysql特点 - 体积小,速度快,特别适合中小型企业,开源,免费的.分成社区版和商业版.</li><li>市面上主流的<strong>关系型数据库</strong> - mysql,oracle,sqlserver(MS-微软)</li><li>mysql软件也是采用c&#x2F;c++编写的.</li></ol></blockquote><h1 id="2-专业术语"><a href="#2-专业术语" class="headerlink" title="2. 专业术语"></a>2. 专业术语</h1><blockquote><ol><li><p>DB - database 数据库 - 将数据按照一定的<em><strong>数据结构</strong></em>来进行存储,管理和组织的.</p><p>数据的仓库</p></li><li><p>DBMS - database management system - 数据库管理系统.用于操纵和控制数据库的系统.</p><p>用于建立,使用和维护我们的db. 用户通过dbms来访问db中的数据,dba通过dbms来管理和维护</p><p>我们的db. 使用dbms来保证db的安全性和完整性.</p></li><li><p>RDBMS - relational database management system关系型数据库管理系统 - 负责管理关系型数据库</p></li><li><p>关系型数据库 - 数据呈现的方式是一张二维表[行和列] - 表格型数据库</p></li><li><p>非关系型数据库[nosql] - 键值对数据库redis,文档型数据库mongodb</p></li><li><p>DBS - 数据库系统 - 类似”生态概念</p><p>DBS &#x3D; DB + DBA[数据库管理员] + DBMS</p></li></ol></blockquote><h1 id="3-安装MySQL"><a href="#3-安装MySQL" class="headerlink" title="3. 安装MySQL"></a>3. 安装MySQL</h1><blockquote><ol><li><p>访问MySQL官网下载: <a class="link" href="https://dev.mysql.com/downloads/mysql/">https://dev.mysql.com/downloads/mysql/<i class="fas fa-external-link-alt"></i></a></p></li><li><blockquote><p>下载压缩包,并解压在一个 非C盘、非中文、非特殊符号的路径下,例如:</p><figure class="highlight plaintext"><table><tr><td class="gutter"><pre><span class="line">1</span><br></pre></td><td class="code"><pre><span class="line">D:\\soft\\mysql-8.0.30-winx64</span><br></pre></td></tr></table></figure></blockquote></li><li><p><strong>进行一个环境变量的配置</strong></p><blockquote><ol><li><p>右击计算机 - 属性 - 高级系统设置 - 环境变量 - 系统变量</p></li><li><p>定位到默认的自带的内置的变量名Path - 编辑 - 新建</p><p>然后将mysql的bin目录的绝对地址拷贝进去即可.</p></li><li><p><strong>以后只要环境变量进行了设置 - 应用 - 确定 - 关闭所有的设置窗口</strong></p><p><strong>一定要重启cmd窗口</strong></p></li><li><p>重新打开cmd - 输入mysql看是否生效</p></li></ol></blockquote></li><li><p>在mysql-8.0.30-winx64下新建一个文件,必须是my.ini</p></li><li><p>my.ini文件中的配置如下</p><p><code>唯一需要修改的只有basedir,把它修改成自己的mysql-8.0.32-winx64的绝对地址</code></p><figure class="highlight plaintext"><table><tr><td class="gutter"><pre><span class="line">1</span><br><span class="line">2</span><br><span class="line">3</span><br><span class="line">4</span><br><span class="line">5</span><br><span class="line">6</span><br><span class="line">7</span><br><span class="line">8</span><br><span class="line">9</span><br><span class="line">10</span><br><span class="line">11</span><br><span class="line">12</span><br><span class="line">13</span><br><span class="line">14</span><br><span class="line">15</span><br><span class="line">16</span><br><span class="line">17</span><br></pre></td><td class="code"><pre><span class="line">[client]</span><br><span class="line"># 设置mysql客户端默认字符集</span><br><span class="line">default-character-set=utf8</span><br><span class="line"> </span><br><span class="line">[mysqld]</span><br><span class="line"># 设置3306端口</span><br><span class="line">port = 3306</span><br><span class="line"># 设置mysql的安装目录</span><br><span class="line">basedir=D:\\soft\\mysql-8.0.32-winx64</span><br><span class="line"># 设置 mysql数据库的数据的存放目录，MySQL 8+ 不需要以下配置，系统自己生成即可，否则有可能报错</span><br><span class="line"># datadir=C:\\web\\sqldata</span><br><span class="line"># 允许最大连接数</span><br><span class="line">max_connections=20</span><br><span class="line"># 服务端使用的字符集默认为8比特编码的latin1字符集</span><br><span class="line">character-set-server=utf8</span><br><span class="line"># 创建新表时将使用的默认存储引擎</span><br><span class="line">default-storage-engine=INNODB</span><br></pre></td></tr></table></figure></li><li><p>用<strong>管理员的身份</strong>打开cmd</p></li><li><p>从cmd利用dos命令进入到mysql-8.0.30-winx64\bin目录</p><figure class="highlight plaintext"><table><tr><td class="gutter"><pre><span class="line">1</span><br></pre></td><td class="code"><pre><span class="line">C:\WINDOWS\&gt;d:</span><br></pre></td></tr></table></figure><figure class="highlight plaintext"><table><tr><td class="gutter"><pre><span class="line">1</span><br><span class="line">2</span><br><span class="line">3</span><br><span class="line">4</span><br></pre></td><td class="code"><pre><span class="line">D:\&gt;cd soft</span><br><span class="line">D:\soft&gt;cd mysql-8.0.30-winx64</span><br><span class="line">D:\soft\mysql-8.0.30-winx64&gt;cd bin</span><br><span class="line">D:\soft\mysql-8.0.30-winx64\bin&gt;</span><br></pre></td></tr></table></figure></li><li><p>初始化DB</p><figure class="highlight plaintext"><table><tr><td class="gutter"><pre><span class="line">1</span><br></pre></td><td class="code"><pre><span class="line">D:\soft\mysql-8.0.30-winx64\bin&gt; mysqld --initialize --console</span><br></pre></td></tr></table></figure><ol><li><strong>分配一个默认的密码</strong></li><li><strong>mysql-8.0.32-winx64是否自动生成了data目录</strong></li></ol></li><li><p>安装</p><figure class="highlight plaintext"><table><tr><td class="gutter"><pre><span class="line">1</span><br></pre></td><td class="code"><pre><span class="line">D:\soft\mysql-8.0.30-winx64\bin&gt; mysqld install</span><br></pre></td></tr></table></figure><p><code>检测一下mysql的服务是否安装成功</code> - 右击计算机 - 管理 - 服务 - 服务和应用程序 - 右边的窗口 - MYSQL</p><p>只有mysql服务处于正在执行的状态,那么mysql才能够正常使用,建议右击MYSQL属性 - 设置成开机自动启动.</p></li><li><p>启动mysql</p><figure class="highlight plaintext"><table><tr><td class="gutter"><pre><span class="line">1</span><br></pre></td><td class="code"><pre><span class="line">D:\soft\mysql-8.0.30-winx64\bin&gt; net start mysql</span><br></pre></td></tr></table></figure><p><code>mysql服务的运行状态 - 正在运行中</code></p></li><li><p>重新开一个cmd窗口</p><p>登陆mysql</p><figure class="highlight plaintext"><table><tr><td class="gutter"><pre><span class="line">1</span><br></pre></td><td class="code"><pre><span class="line">D:\soft\mysql-8.0.30-winx64\bin&gt; mysql -uroot -p临时密码</span><br></pre></td></tr></table></figure><p>如果登陆失败:</p><ol><li><p>关闭mysql服务</p><p>重新以<strong>管理员身份</strong>打开cmd</p><figure class="highlight plaintext"><table><tr><td class="gutter"><pre><span class="line">1</span><br></pre></td><td class="code"><pre><span class="line">C:\User\admin&gt;net stop mysql</span><br></pre></td></tr></table></figure></li><li><p>删除data目录</p></li><li><p>重第八步重新开始</p></li></ol></li><li><p>直接修改密码即可</p><figure class="highlight plaintext"><table><tr><td class="gutter"><pre><span class="line">1</span><br></pre></td><td class="code"><pre><span class="line">alter user &#x27;root&#x27;@&#x27;localhost&#x27; identified by &#x27;root&#x27;;</span><br></pre></td></tr></table></figure></li><li><p>退出mysql登录</p><figure class="highlight plaintext"><table><tr><td class="gutter"><pre><span class="line">1</span><br></pre></td><td class="code"><pre><span class="line">mysql&gt;exit</span><br></pre></td></tr></table></figure></li><li><p>重新登录即可</p><figure class="highlight plaintext"><table><tr><td class="gutter"><pre><span class="line">1</span><br></pre></td><td class="code"><pre><span class="line">mysql -uroot -proot</span><br></pre></td></tr></table></figure></li></ol></blockquote><h1 id="4-SQL分类"><a href="#4-SQL分类" class="headerlink" title="4. SQL分类"></a>4. SQL分类</h1><blockquote><p>它同时也是我们的脚本文件的后缀.</p></blockquote><blockquote><p>structured query language结构化查询语言…</p><p>按照功能来划分</p><ol><li>DDL - Data Definition Language - 数据定义语言</li></ol><p>create,drop,alter等等…</p><ol><li><p>DCL - Data Control Language - 数据控制语言</p><p>grant(授权),revoke(取消权限)等等…</p></li><li><p>DQL - Data Query Languge - 数据查询语言</p><p><strong>select - 查询</strong></p></li><li><p>DML - Data Manipution Language - 数据操纵语言</p><p><strong>insert,delete,update</strong></p></li><li><p>TCL - Transaction Control Languge - 事务控制语言</p><p>commit,rollback,savepoint等等…</p></li></ol></blockquote>]]></content>


    <summary type="html">&lt;h1 id=&quot;1-MySQL介绍&quot;&gt;&lt;a href=&quot;#1-MySQL介绍&quot; class=&quot;headerlink&quot; title=&quot;1. MySQL介绍&quot;&gt;&lt;/a&gt;1. MySQL介绍&lt;/h1&gt;&lt;blockquote&gt;
&lt;ol&gt;
&lt;li&gt;mysql属于瑞典的Mysql AB公司的</summary>


    <category term="Mysql的安装与配置" scheme="http://rs-zt.github.io/tags/Mysql%E7%9A%84%E5%AE%89%E8%A3%85%E4%B8%8E%E9%85%8D%E7%BD%AE/"/>
    
  </entry>
  
  <entry>
    <title>hexo个人博客的搭建</title>
    <link href="http://rs-zt.github.io/2023/07/11/hexo%E4%B8%AA%E4%BA%BA%E5%8D%9A%E5%AE%A2%E7%9A%84%E6%90%AD%E5%BB%BA/"/>
    <id>http://rs-zt.github.io/2023/07/11/hexo%E4%B8%AA%E4%BA%BA%E5%8D%9A%E5%AE%A2%E7%9A%84%E6%90%AD%E5%BB%BA/</id>
    <published>2023-07-11T13:37:37.000Z</published>
    <updated>2023-07-12T01:10:04.567Z</updated>
    
    <content type="html"><![CDATA[<h1 id="hexo-github搭建博客服务器"><a href="#hexo-github搭建博客服务器" class="headerlink" title="hexo+github搭建博客服务器"></a>hexo+github搭建博客服务器</h1><blockquote><ol><li>csdn,简书,有道笔记 - <strong>广告比较多</strong></li><li>hexo+github[比较慢,翻墙]&#x2F;gitee[Git pages服务器 - 维护]&#x2F;<strong>阿里云服务器</strong></li></ol></blockquote><h1 id="安装nodejs"><a href="#安装nodejs" class="headerlink" title="安装nodejs"></a>安装nodejs</h1><blockquote><ol><li>非中文的非特殊字符的目录中[目录中不要出现空格或者带有特殊符号的]</li><li>D:&#x2F;node-v14.17.3-win-x64</li></ol></blockquote><h2 id="环境变量的配置"><a href="#环境变量的配置" class="headerlink" title="环境变量的配置"></a>环境变量的配置</h2><blockquote><ol><li><p>桌面计算机 - 右击 - 属性 - 高级系统设置 - 环境变量(N)</p></li><li><p>定位到下方的系统变量</p></li><li><p>定位到变量名 - Path - 编辑 - 新建</p></li><li><p>D:&#x2F;node-v14.17.3-win-x64</p></li><li><p>一定要关闭所有的环境变量配置的窗口 - 确定</p></li><li><p>打开终端[如果终端已经打开了,关闭 - 重新打开]</p><p>win[微软图标]+r - 输入cmd  - 输入如下指令检测nodejs是否配置成功</p><figure class="highlight cmd"><table><tr><td class="gutter"><pre><span class="line">1</span><br><span class="line">2</span><br><span class="line">3</span><br><span class="line">4</span><br><span class="line">5</span><br></pre></td><td class="code"><pre><span class="line">npm -v</span><br><span class="line"><span class="number">6</span>.<span class="number">14</span>.<span class="number">5</span> 出现版本号,则说明配置成功</span><br><span class="line">   </span><br><span class="line">如果出现了不是内部或者外部的命令的同学,请检查自己的nodejs解压缩之后的路径是否</span><br><span class="line">成功配置到了<span class="built_in">path</span>中</span><br></pre></td></tr></table></figure></li></ol></blockquote><h2 id="简单认识npm"><a href="#简单认识npm" class="headerlink" title="简单认识npm"></a>简单认识npm</h2><blockquote><p>npm是javascript的一个**包[前端框架]**管理工具,并且是nodejs平台默认的包管理工具.</p><p>通过npm可以安装,共享,分发代码,管理项目依赖关系.</p><p>类似于java中的maven或者gradle[强大的项目构建工具以及项目依赖管理工具]</p></blockquote><h2 id="npm简单使用"><a href="#npm简单使用" class="headerlink" title="npm简单使用"></a>npm简单使用</h2><h3 id="修改镜像"><a href="#修改镜像" class="headerlink" title="修改镜像"></a>修改镜像</h3><blockquote><p>为了下载速度变快,修改npm的镜像</p><figure class="highlight cmd"><table><tr><td class="gutter"><pre><span class="line">1</span><br></pre></td><td class="code"><pre><span class="line">npm config <span class="built_in">set</span> registry https://registry.npm.taobao.org</span><br></pre></td></tr></table></figure><p>验证一下,镜像是否成功修改了</p><figure class="highlight cmd"><table><tr><td class="gutter"><pre><span class="line">1</span><br><span class="line">2</span><br><span class="line">3</span><br></pre></td><td class="code"><pre><span class="line">npm config get registry</span><br><span class="line"><span class="function"></span></span><br><span class="line"><span class="function">https://<span class="title">registry.npm.taobao.org</span>/</span></span><br></pre></td></tr></table></figure></blockquote><h2 id="简单使用-不需要操作"><a href="#简单使用-不需要操作" class="headerlink" title="简单使用 - 不需要操作"></a>简单使用 - 不需要操作</h2><blockquote><ol><li><p>下载bootstrap</p><p>npm install 框架名称  - 默认下载的是最新的版本</p><figure class="highlight js"><table><tr><td class="gutter"><pre><span class="line">1</span><br></pre></td><td class="code"><pre><span class="line">npm install bootstrap@<span class="number">3</span></span><br></pre></td></tr></table></figure></li></ol></blockquote><h1 id="Hexo官网"><a href="#Hexo官网" class="headerlink" title="Hexo官网"></a>Hexo官网</h1><blockquote><p><a class="link" href="https://hexo.io/zh-cn/docs/">https://hexo.io/zh-cn/docs/<i class="fas fa-external-link-alt"></i></a></p></blockquote><h2 id="安装"><a href="#安装" class="headerlink" title="安装"></a>安装</h2><blockquote><ol><li><p>假设你在D盘根目录下新建了一个文件夹hello-hexo[博客项目的根目录]</p></li><li><p>win+r - 打开终端</p></li><li><p>通过dos命令进入到hello-hexo目录中</p><figure class="highlight cmd"><table><tr><td class="gutter"><pre><span class="line">1</span><br><span class="line">2</span><br><span class="line">3</span><br></pre></td><td class="code"><pre><span class="line"><span class="function">C:/<span class="title">User</span>/<span class="title">admin</span>&gt;<span class="title">d</span>:</span></span><br><span class="line"><span class="function"><span class="title">D</span>:&gt;<span class="title">cd</span> <span class="title">hello</span>-<span class="title">hexo</span></span></span><br><span class="line"><span class="function"><span class="title">D</span>:/<span class="title">hello</span>-<span class="title">hexo</span>&gt;<span class="title">npm</span> <span class="title">install</span> <span class="title">hexo</span>-<span class="title">cli</span> -<span class="title">g</span></span></span><br></pre></td></tr></table></figure></li></ol></blockquote><h2 id="创建真正的博客目录"><a href="#创建真正的博客目录" class="headerlink" title="创建真正的博客目录"></a>创建真正的博客目录</h2><figure class="highlight cmd"><table><tr><td class="gutter"><pre><span class="line">1</span><br></pre></td><td class="code"><pre><span class="line"><span class="function">D:/<span class="title">hello</span>-<span class="title">hexo</span>&gt;<span class="title">hexo</span> <span class="title">init</span> <span class="title">hello</span>-<span class="title">blog</span></span></span><br></pre></td></tr></table></figure><figure class="highlight cmd"><table><tr><td class="gutter"><pre><span class="line">1</span><br><span class="line">2</span><br></pre></td><td class="code"><pre><span class="line"><span class="built_in">cd</span> hello-blog</span><br><span class="line"><span class="function">D:/<span class="title">hello</span>-<span class="title">hexo</span>/<span class="title">hello</span>-<span class="title">blog</span>&gt;<span class="title">npm</span> <span class="title">install</span></span></span><br></pre></td></tr></table></figure><h2 id="测试-启动博客服务器"><a href="#测试-启动博客服务器" class="headerlink" title="测试 - 启动博客服务器"></a>测试 - 启动博客服务器</h2><figure class="highlight cmd"><table><tr><td class="gutter"><pre><span class="line">1</span><br></pre></td><td class="code"><pre><span class="line"><span class="function">D:/<span class="title">hello</span>-<span class="title">hexo</span>/<span class="title">hello</span>-<span class="title">blog</span>&gt;<span class="title">hexo</span> <span class="title">s</span></span></span><br></pre></td></tr></table></figure><p><code>关闭服务器</code></p><figure class="highlight cmd"><table><tr><td class="gutter"><pre><span class="line">1</span><br></pre></td><td class="code"><pre><span class="line">ctrl+c</span><br></pre></td></tr></table></figure><p><em><strong>打开浏览器输入:localhost:4000</strong></em></p><h2 id="常用主题模板"><a href="#常用主题模板" class="headerlink" title="常用主题模板"></a>常用主题模板</h2><blockquote><p><a class="link" href="https://blog.csdn.net/zgd826237710/article/details/99671027">https://blog.csdn.net/zgd826237710/article/details/99671027<i class="fas fa-external-link-alt"></i></a></p><p>使用git命令来进行克隆,需要提前安装好git,检测git是否安装成功,<strong>重新打开终端</strong></p><figure class="highlight cmd"><table><tr><td class="gutter"><pre><span class="line">1</span><br></pre></td><td class="code"><pre><span class="line">git --version</span><br></pre></td></tr></table></figure></blockquote><h2 id="注册码云账号"><a href="#注册码云账号" class="headerlink" title="注册码云账号"></a>注册码云账号</h2><blockquote><p>推荐用QQ注册一下</p><p>本地配置码云账号信息 - 配置文件 - 位置windows的用户主目录下</p><p>C:&#x2F;User&#x2F;计算机用户名 - 观察是否存在**.gitconfig**文件,添加如下内容</p><figure class="highlight plaintext"><table><tr><td class="gutter"><pre><span class="line">1</span><br><span class="line">2</span><br><span class="line">3</span><br></pre></td><td class="code"><pre><span class="line">[user]</span><br><span class="line">email = 码云的QQ邮箱</span><br><span class="line">name = 用户名</span><br></pre></td></tr></table></figure></blockquote><h2 id="安装模板"><a href="#安装模板" class="headerlink" title="安装模板"></a>安装模板</h2><blockquote><p>通过cmd进入到hello-blog目录中的themes目录中</p><figure class="highlight cmd"><table><tr><td class="gutter"><pre><span class="line">1</span><br><span class="line">2</span><br></pre></td><td class="code"><pre><span class="line"><span class="function">D:/<span class="title">hello</span>-<span class="title">hexo</span>/<span class="title">hello</span>-<span class="title">blog</span>&gt;<span class="title">cd</span> <span class="title">themes</span></span></span><br><span class="line"><span class="function"><span class="title">D</span>://<span class="title">hello</span>-<span class="title">hexo</span>/<span class="title">hello</span>-<span class="title">blog</span>/<span class="title">themes</span>&gt;<span class="title">git</span> <span class="title">clone</span> <span class="title">https</span>://<span class="title">gitee.com</span>/<span class="title">guancg</span>/<span class="title">hexo</span>-<span class="title">theme</span>-<span class="title">pure.git</span></span></span><br></pre></td></tr></table></figure></blockquote><p>或者直接从github上直接clone</p><figure class="highlight cmd"><table><tr><td class="gutter"><pre><span class="line">1</span><br></pre></td><td class="code"><pre><span class="line">git clone https://github.com/cofess/hexo-theme-pure.git</span><br></pre></td></tr></table></figure><h1 id="更新主题配置"><a href="#更新主题配置" class="headerlink" title="更新主题配置"></a>更新主题配置</h1><blockquote><ol><li><p>指定新的主题</p><p>hello-blog目录下的_config.yml文件</p><figure class="highlight yml"><table><tr><td class="gutter"><pre><span class="line">1</span><br></pre></td><td class="code"><pre><span class="line"><span class="attr">theme:</span> <span class="string">hexo-theme-pure</span> </span><br></pre></td></tr></table></figure></li></ol></blockquote><blockquote><ol start="2"><li>重启服务器hexo s</li></ol></blockquote><h1 id="个人信息"><a href="#个人信息" class="headerlink" title="个人信息"></a>个人信息</h1><p>hexo-theme-pure&#x2F;_config.yml文件</p><figure class="highlight yml"><table><tr><td class="gutter"><pre><span class="line">1</span><br><span class="line">2</span><br><span class="line">3</span><br><span class="line">4</span><br><span class="line">5</span><br></pre></td><td class="code"><pre><span class="line"><span class="string">overriden</span></span><br><span class="line">  <span class="attr">author:</span> <span class="string">任胜</span></span><br><span class="line">  <span class="attr">author_title:</span> <span class="string">高级打字员</span></span><br><span class="line">  <span class="attr">author_description:</span> <span class="string">个人简介。</span></span><br><span class="line">  <span class="attr">location:</span> <span class="string">SuZhou,</span> <span class="string">China</span></span><br></pre></td></tr></table></figure><h1 id="Markdown语法"><a href="#Markdown语法" class="headerlink" title="Markdown语法"></a>Markdown语法</h1><blockquote><p>语法的编辑器 - <a class="link" href="https://typora.io/">https://typora.io/<i class="fas fa-external-link-alt"></i></a></p><p>文件的后缀是md</p><figure class="highlight txt"><table><tr><td class="gutter"><pre><span class="line">1</span><br><span class="line">2</span><br><span class="line">3</span><br><span class="line">4</span><br><span class="line">5</span><br><span class="line">6</span><br><span class="line">7</span><br><span class="line">8</span><br><span class="line">9</span><br><span class="line">10</span><br><span class="line">11</span><br><span class="line">12</span><br><span class="line">13</span><br><span class="line">14</span><br><span class="line">15</span><br><span class="line">16</span><br><span class="line">17</span><br><span class="line">18</span><br><span class="line">19</span><br><span class="line">20</span><br><span class="line">21</span><br><span class="line">22</span><br><span class="line">23</span><br><span class="line">24</span><br><span class="line">25</span><br><span class="line">26</span><br><span class="line">27</span><br><span class="line">28</span><br><span class="line">29</span><br><span class="line">30</span><br><span class="line">31</span><br><span class="line">32</span><br><span class="line">33</span><br><span class="line">34</span><br><span class="line">35</span><br></pre></td><td class="code"><pre><span class="line">常用语法如下:</span><br><span class="line"></span><br><span class="line">1. 标题的语法:</span><br><span class="line">1~6标题 - # 一级标题    ## 二级标题   </span><br><span class="line"></span><br><span class="line">2. 代码块 - java,js,mysql...</span><br><span class="line"></span><br><span class="line">​~~~java 敲enter键</span><br><span class="line"></span><br><span class="line">3. 列表</span><br><span class="line">3-1. 无序列表</span><br><span class="line">     * 列表名称</span><br><span class="line"></span><br><span class="line">     有序列表</span><br><span class="line">     1. 列表名称</span><br><span class="line"></span><br><span class="line">4. 高亮显示</span><br><span class="line">   `高亮显示内容`</span><br><span class="line"></span><br><span class="line">5. 加粗字体</span><br><span class="line">   **粗体**</span><br><span class="line"></span><br><span class="line">6. 斜体</span><br><span class="line">   *斜体*</span><br><span class="line"></span><br><span class="line">7. 粗+斜</span><br><span class="line">   ***粗斜***</span><br><span class="line"></span><br><span class="line">8. 段落</span><br><span class="line">   &gt; 空格</span><br><span class="line"></span><br><span class="line">9. 引入外部图片</span><br><span class="line">   ![](xx.png)</span><br><span class="line"></span><br><span class="line">10. 表格</span><br></pre></td></tr></table></figure></blockquote><h1 id="新建博文"><a href="#新建博文" class="headerlink" title="新建博文"></a>新建博文</h1><figure class="highlight cmd"><table><tr><td class="gutter"><pre><span class="line">1</span><br></pre></td><td class="code"><pre><span class="line"><span class="function">D://<span class="title">hello</span>-<span class="title">hexo</span>/<span class="title">hello</span>-<span class="title">blog</span>&gt;<span class="title">hexo</span> <span class="title">n</span> <span class="title">java</span></span></span><br></pre></td></tr></table></figure><p>效果:hello-blog目录下的source&#x2F;_ports&#x2F;自动生成一个java.md文件</p><p>重启blog服务器</p><figure class="highlight cmd"><table><tr><td class="gutter"><pre><span class="line">1</span><br></pre></td><td class="code"><pre><span class="line"><span class="function">D://<span class="title">hello</span>-<span class="title">hexo</span>/<span class="title">hello</span>-<span class="title">blog</span>&gt;<span class="title">hexo</span> <span class="title">s</span></span></span><br></pre></td></tr></table></figure><h1 id="主题的侧边栏"><a href="#主题的侧边栏" class="headerlink" title="主题的侧边栏"></a>主题的侧边栏</h1><blockquote><p>侧边栏的链接生效</p><p>将&#x2F;hello-blog&#x2F;themes&#x2F;hexo-theme-pure&#x2F;_source&#x2F;下的除了_data文件夹,其余文件夹</p><p>拷贝一份放入到hello-blog目录下的source目录中即可</p></blockquote><h1 id="文章的分类和标签"><a href="#文章的分类和标签" class="headerlink" title="文章的分类和标签"></a>文章的分类和标签</h1><blockquote><p>只需要在文章的.md文件的自动生成的头部添加</p><figure class="highlight txt"><table><tr><td class="gutter"><pre><span class="line">1</span><br><span class="line">2</span><br><span class="line">3</span><br><span class="line">4</span><br></pre></td><td class="code"><pre><span class="line">title: java</span><br><span class="line">date: 2021-07-13 08:44:42</span><br><span class="line">categories: java</span><br><span class="line">tags: java</span><br></pre></td></tr></table></figure></blockquote><h1 id="博客的语言环境设置"><a href="#博客的语言环境设置" class="headerlink" title="博客的语言环境设置"></a>博客的语言环境设置</h1><blockquote><p>设置中文</p><p>hello-blog下的_config.yml文件中</p><p>language: zh-CN</p></blockquote><h1 id="图片显示问题"><a href="#图片显示问题" class="headerlink" title="图片显示问题"></a>图片显示问题</h1><blockquote><ol><li><p>安装插件 - npm install <a class="link" href="https://gitee.com/guancg/hexo-asset-image.git">https://gitee.com/guancg/hexo-asset-image.git<i class="fas fa-external-link-alt"></i></a> –save</p></li><li><p>需要到hello-blog&#x2F;_config.yml文件中进行配置</p><figure class="highlight yml"><table><tr><td class="gutter"><pre><span class="line">1</span><br></pre></td><td class="code"><pre><span class="line"><span class="attr">post_asset_folder:</span> <span class="literal">true</span></span><br></pre></td></tr></table></figure></li><li><p>hexo n 机器学习</p><p><code>效果就是除了生成了机器学习.md还有一个机器学习文件夹,那么这篇文章的所有的图片就可以存储在机器学习文件夹中</code></p></li><li><p>hexo s</p></li></ol></blockquote><h1 id="内置搜索的功能"><a href="#内置搜索的功能" class="headerlink" title="内置搜索的功能"></a>内置搜索的功能</h1><blockquote><figure class="highlight yml"><table><tr><td class="gutter"><pre><span class="line">1</span><br><span class="line">2</span><br><span class="line">3</span><br><span class="line">4</span><br></pre></td><td class="code"><pre><span class="line"><span class="comment"># Search</span></span><br><span class="line"><span class="attr">search:</span></span><br><span class="line"><span class="attr">insight:</span> <span class="literal">true</span> <span class="comment"># you need to install `hexo-generator-json-content` before using Insight Search</span></span><br><span class="line"><span class="attr">baidu:</span> <span class="literal">false</span> <span class="comment"># you need to disable other search engines to use Baidu search</span></span><br></pre></td></tr></table></figure><p>安装内置搜索插件</p><p>npm i -S hexo-generator-json-content</p></blockquote><h1 id="评论"><a href="#评论" class="headerlink" title="评论"></a>评论</h1><blockquote><p>不需要本地数据库进行存储的,用的是第三方的.</p><p>LeanCloud - 官网地址 - <a class="link" href="https://www.leancloud.cn/">https://www.leancloud.cn/<i class="fas fa-external-link-alt"></i></a></p><p>注册 - 登录 - 控制台 - 创建应用 - 右下设置 - 应用凭证</p><p>appId - sljUq97vUAdLAo7XQdf13aFR-gzGzoHsz</p><p>appKey - 3hn4ijEgSzJeRV4nkmXThmGV</p></blockquote><p><code>在hexo-theme-pure\_config.yml文件中配置</code></p><blockquote><figure class="highlight yml"><table><tr><td class="gutter"><pre><span class="line">1</span><br><span class="line">2</span><br><span class="line">3</span><br><span class="line">4</span><br><span class="line">5</span><br><span class="line">6</span><br><span class="line">7</span><br><span class="line">8</span><br><span class="line">9</span><br><span class="line">10</span><br></pre></td><td class="code"><pre><span class="line"><span class="attr">valine:</span> <span class="comment"># Valine. https://valine.js.org</span></span><br><span class="line"> <span class="attr">appid:</span> <span class="string">sljUq97vUAdLAo7XQdf13aFR-gzGzoHsz</span>  <span class="comment"># your leancloud application appid</span></span><br><span class="line"> <span class="attr">appkey:</span> <span class="string">3hn4ijEgSzJeRV4nkmXThmGV#</span> <span class="string">your</span> <span class="string">leancloud</span> <span class="string">application</span> <span class="string">appkey</span></span><br><span class="line"> <span class="attr">notify:</span> <span class="literal">false</span> <span class="comment"># mail notifier , https://github.com/xCss/Valine/wiki</span></span><br><span class="line"> <span class="attr">verify:</span> <span class="literal">false</span> <span class="comment"># Verification code</span></span><br><span class="line"> <span class="attr">placeholder:</span> <span class="string">Just</span> <span class="string">go</span> <span class="string">go</span> <span class="comment"># comment box placeholder</span></span><br><span class="line"> <span class="attr">avatar:</span> <span class="string">mm</span> <span class="comment"># gravatar style</span></span><br><span class="line"> <span class="attr">meta:</span> <span class="string">nick,mail,link</span> <span class="comment"># custom comment header</span></span><br><span class="line"> <span class="attr">pageSize:</span> <span class="number">10</span> <span class="comment"># pagination size</span></span><br><span class="line"> <span class="attr">visitor:</span> <span class="literal">true</span> <span class="comment"># Article reading statistic https://valine.js.org/visitor.html</span></span><br></pre></td></tr></table></figure></blockquote><p>#字数统计&amp;阅读时长</p><blockquote><ol><li><p>npm i -S hexo-wordcount</p></li><li><p>hexo-theme-pure_config.yml文件中配置</p><figure class="highlight yml"><table><tr><td class="gutter"><pre><span class="line">1</span><br><span class="line">2</span><br><span class="line">3</span><br><span class="line">4</span><br></pre></td><td class="code"><pre><span class="line"><span class="attr">postCount:</span></span><br><span class="line">  <span class="attr">enable:</span> <span class="literal">true</span></span><br><span class="line">  <span class="attr">wordcount:</span> <span class="literal">true</span>  <span class="comment"># 文章字数统计</span></span><br><span class="line">  <span class="attr">min2read:</span> <span class="literal">true</span>  <span class="comment"># 阅读时长预计 </span></span><br></pre></td></tr></table></figure></li></ol></blockquote><h1 id="附件-优秀插件"><a href="#附件-优秀插件" class="headerlink" title="附件-优秀插件"></a>附件-优秀插件</h1><blockquote><ol><li><p>显示图片</p><figure class="highlight cmd"><table><tr><td class="gutter"><pre><span class="line">1</span><br></pre></td><td class="code"><pre><span class="line">npm install https://gitee.com/guancg/hexo-asset-image.git --save</span><br></pre></td></tr></table></figure></li><li><p>内置搜索</p><figure class="highlight cmd"><table><tr><td class="gutter"><pre><span class="line">1</span><br></pre></td><td class="code"><pre><span class="line">npm i -S hexo-generator-json-content</span><br></pre></td></tr></table></figure></li><li><p>字数统计&amp;阅读时长</p><figure class="highlight cmd"><table><tr><td class="gutter"><pre><span class="line">1</span><br></pre></td><td class="code"><pre><span class="line">npm i -S hexo-wordcount</span><br></pre></td></tr></table></figure></li></ol></blockquote><blockquote><ol start="4"><li><p>github部署</p><figure class="highlight cmd"><table><tr><td class="gutter"><pre><span class="line">1</span><br></pre></td><td class="code"><pre><span class="line">npm install hexo-deployer-git --save</span><br></pre></td></tr></table></figure></li></ol></blockquote><h1 id="部署github"><a href="#部署github" class="headerlink" title="部署github"></a>部署github</h1><blockquote><p>git config –global user.name “github用户名” </p><p>git config –global user.email “github邮箱”</p></blockquote><blockquote><p>github.com</p></blockquote><blockquote><p>chrome浏览器 + iguge - <a class="link" href="https://iguge.app/">https://iguge.app/<i class="fas fa-external-link-alt"></i></a></p></blockquote><blockquote><p>新建的仓库的名称必须是<strong>guancgsuccess.github.io</strong></p><p>仓库地址 - <a class="link" href="https://github.com/Rs-zt/Rs-zt.github.io.git">https://github.com/Rs-zt/Rs-zt.github.io.git<i class="fas fa-external-link-alt"></i></a></p></blockquote><blockquote><p>安装github部署插件</p><p>npm install hexo-deployer-git –save</p></blockquote><blockquote><p>hello-blog&#x2F;_config.yml文件</p><figure class="highlight yml"><table><tr><td class="gutter"><pre><span class="line">1</span><br><span class="line">2</span><br><span class="line">3</span><br><span class="line">4</span><br></pre></td><td class="code"><pre><span class="line"><span class="attr">deploy:</span></span><br><span class="line"><span class="attr">type:</span> <span class="string">&#x27;git&#x27;</span></span><br><span class="line"><span class="attr">repo:</span> <span class="string">&#x27;https://github.com/Rs-zt/Rs-zt.github.io.git&#x27;</span></span><br><span class="line"><span class="attr">branch:</span> <span class="string">&#x27;master&#x27;</span></span><br></pre></td></tr></table></figure></blockquote><p><code>hexo三连操作</code></p><figure class="highlight cmd"><table><tr><td class="gutter"><pre><span class="line">1</span><br><span class="line">2</span><br><span class="line">3</span><br><span class="line">4</span><br></pre></td><td class="code"><pre><span class="line">hexo cl</span><br><span class="line">hexo g</span><br><span class="line">hexo s</span><br><span class="line">hexo d</span><br></pre></td></tr></table></figure><p>浏览器输入 - Rs-zt.github.io</p>]]></content>


    <summary type="html">&lt;h1 id=&quot;hexo-github搭建博客服务器&quot;&gt;&lt;a href=&quot;#hexo-github搭建博客服务器&quot; class=&quot;headerlink&quot; title=&quot;hexo+github搭建博客服务器&quot;&gt;&lt;/a&gt;hexo+github搭建博客服务器&lt;/h1&gt;&lt;blockquo</summary>


    <category term="hexo" scheme="http://rs-zt.github.io/tags/hexo/"/>
    
  </entry>
  
  <entry>
    <title>Hello World</title>
    <link href="http://rs-zt.github.io/2023/07/10/hello-world/"/>
    <id>http://rs-zt.github.io/2023/07/10/hello-world/</id>
    <published>2023-07-10T12:22:55.094Z</published>
    <updated>2023-07-10T12:20:53.663Z</updated>
    
    <content type="html"><![CDATA[<p>Welcome to <a class="link" href="https://hexo.io/">Hexo<i class="fas fa-external-link-alt"></i></a>! This is your very first post. Check <a class="link" href="https://hexo.io/docs/">documentation<i class="fas fa-external-link-alt"></i></a> for more info. If you get any problems when using Hexo, you can find the answer in <a class="link" href="https://hexo.io/docs/troubleshooting.html">troubleshooting<i class="fas fa-external-link-alt"></i></a> or you can ask me on <a class="link" href="https://github.com/hexojs/hexo/issues">GitHub<i class="fas fa-external-link-alt"></i></a>.</p><h2 id="Quick-Start"><a href="#Quick-Start" class="headerlink" title="Quick Start"></a>Quick Start</h2><h3 id="Create-a-new-post"><a href="#Create-a-new-post" class="headerlink" title="Create a new post"></a>Create a new post</h3><figure class="highlight bash"><table><tr><td class="gutter"><pre><span class="line">1</span><br></pre></td><td class="code"><pre><span class="line">$ hexo new <span class="string">&quot;My New Post&quot;</span></span><br></pre></td></tr></table></figure><p>More info: <a class="link" href="https://hexo.io/docs/writing.html">Writing<i class="fas fa-external-link-alt"></i></a></p><h3 id="Run-server"><a href="#Run-server" class="headerlink" title="Run server"></a>Run server</h3><figure class="highlight bash"><table><tr><td class="gutter"><pre><span class="line">1</span><br></pre></td><td class="code"><pre><span class="line">$ hexo server</span><br></pre></td></tr></table></figure><p>More info: <a class="link" href="https://hexo.io/docs/server.html">Server<i class="fas fa-external-link-alt"></i></a></p><h3 id="Generate-static-files"><a href="#Generate-static-files" class="headerlink" title="Generate static files"></a>Generate static files</h3><figure class="highlight bash"><table><tr><td class="gutter"><pre><span class="line">1</span><br></pre></td><td class="code"><pre><span class="line">$ hexo generate</span><br></pre></td></tr></table></figure><p>More info: <a class="link" href="https://hexo.io/docs/generating.html">Generating<i class="fas fa-external-link-alt"></i></a></p><h3 id="Deploy-to-remote-sites"><a href="#Deploy-to-remote-sites" class="headerlink" title="Deploy to remote sites"></a>Deploy to remote sites</h3><figure class="highlight bash"><table><tr><td class="gutter"><pre><span class="line">1</span><br></pre></td><td class="code"><pre><span class="line">$ hexo deploy</span><br></pre></td></tr></table></figure><p>More info: <a class="link" href="https://hexo.io/docs/one-command-deployment.html">Deployment<i class="fas fa-external-link-alt"></i></a></p>]]></content>


    <summary type="html">&lt;p&gt;Welcome to &lt;a class=&quot;link&quot; href=&quot;https://hexo.io/&quot;&gt;Hexo&lt;i class=&quot;fas fa-external-link-alt&quot;&gt;&lt;/i&gt;&lt;/a&gt;! This is your very first post. Check </summary>


  </entry>
  
</feed>